
Processing Purchase Orders (EDI 850)
In a typical supplier-buyer relationship, the transaction cycle begins when a buyer sends a Purchase Order (EDI 850) to order goods. The EDI Generator allows you to receive these orders, view them in a human-readable format, and generate follow-up transactions like Purchase Order Acknowledgements (EDI 855), Advance Ship Notices (EDI 856), and Invoices (EDI 810).
Receiving a Purchase Order
When a buyer transmits a Purchase Order to your configured AS2 station or SFTP inbox, the EDI Generator automatically processes it.
You can find the received Purchase Order in two main views within the web console:
Inbox: Lists all incoming files received from all trading partners. Purchase Orders will appear with the type PO.

PO / Retail > PO: Under the side menu, selecting PO (nested under the Retail section if you have multiple domains enabled) displays a dedicated list of all received Purchase Orders.

To review the details of a received Purchase Order, click the View button (represented by a preview icon) at the end of the row (available in both the Inbox list view and the PO list view). The detailed view will load and present three main tabs:
Formatted View
This view translates the raw, complex EDI segments into a clean, human-readable, invoice-style layout. In addition to basic order information, it displays the following details if they are present in the incoming file:
- Header Information: Displays PO number, order date, sender information, and billing/shipping addresses.
- Line Items: Displays the list of ordered items, including line numbers, item identifiers (such as the SKU, part number, or catalog number), description, quantity, unit price, and total line cost.
- Additional Details:
- Date/Time References: Requested ship date, delivery date, cancel date, or other key date references.
- Terms of Sale & Deferred Terms: Payment due dates, discount terms, and discount percentages.
- Carrier Routing & Shipping Instructions: FOB terms, routing carrier name, transport method, carrier weight/quantity (TD1), and carrier special handling (TD4).
- Service, Promotion, Allowance, or Charge Details (SAC): Applicable allowances, promotional discounts, or charges.
- Administrative Contacts: Buyer contact names, phone numbers, and emails.
- Restrictions & Reference Identifiers: Custom conditions/restrictions and reference numbers (e.g. promotional codes, contract numbers).
- Print Option: Click the Print (printer icon) button in the upper-right corner of the Formatted View to print it or save it as a PDF.
Raw Message
Displays the raw EDI X12 segments exactly as transmitted by the partner. This is useful for debugging and checking specific segment qualifiers.
JSON Representation
Displays the parsed JSON representation generated by the EDI Generator.
Key Details Visible in a Purchase Order
When reviewing a PO in the detail view, pay close attention to the following details to ensure accurate fulfillment:
- PO Number & Date: Crucial for matching subsequent acknowledgements, shipments, and invoices.
- Ship To Address: The destination warehouse or store where the goods must be delivered.
- Cancel Date / Do Not Deliver Before Date: Dates indicating the delivery window.
- Item Details:
- SKU / UPC: Supplier and buyer identification codes.
- Quantity Ordered: The exact count of units ordered.
- Unit Price: The agreed-upon unit rate.
Next Steps & Generating Follow-Up Documents
After receiving and reviewing a Purchase Order, you can generate follow-up documents (like PO Acknowledgements, ASNs, or Invoices) in two ways:
From the Purchase Orders List (Row Action)
Without opening the details page, you can generate documents directly from the PO list view:
- Locate the Purchase Order row.
- At the end of the row (on the right), click the Generate button.
- Select the desired document to generate (Generate PO Ack, Generate ASN, or Generate Invoice) from the dropdown menu.
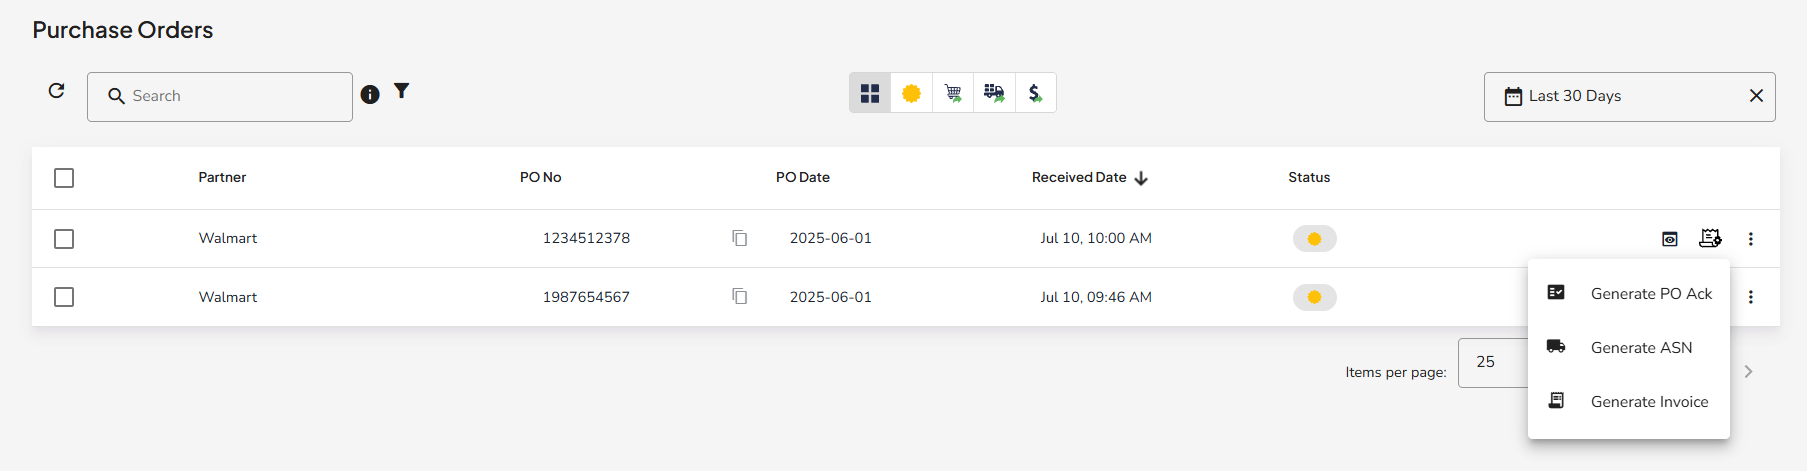
From the Purchase Order Details (Header Buttons)
If you are already viewing a specific Purchase Order’s details page:
- Look at the top of the detail view (above the tabs).
- The options are displayed directly as buttons: Generate PO Ack, Generate ASN, and Generate Invoice.
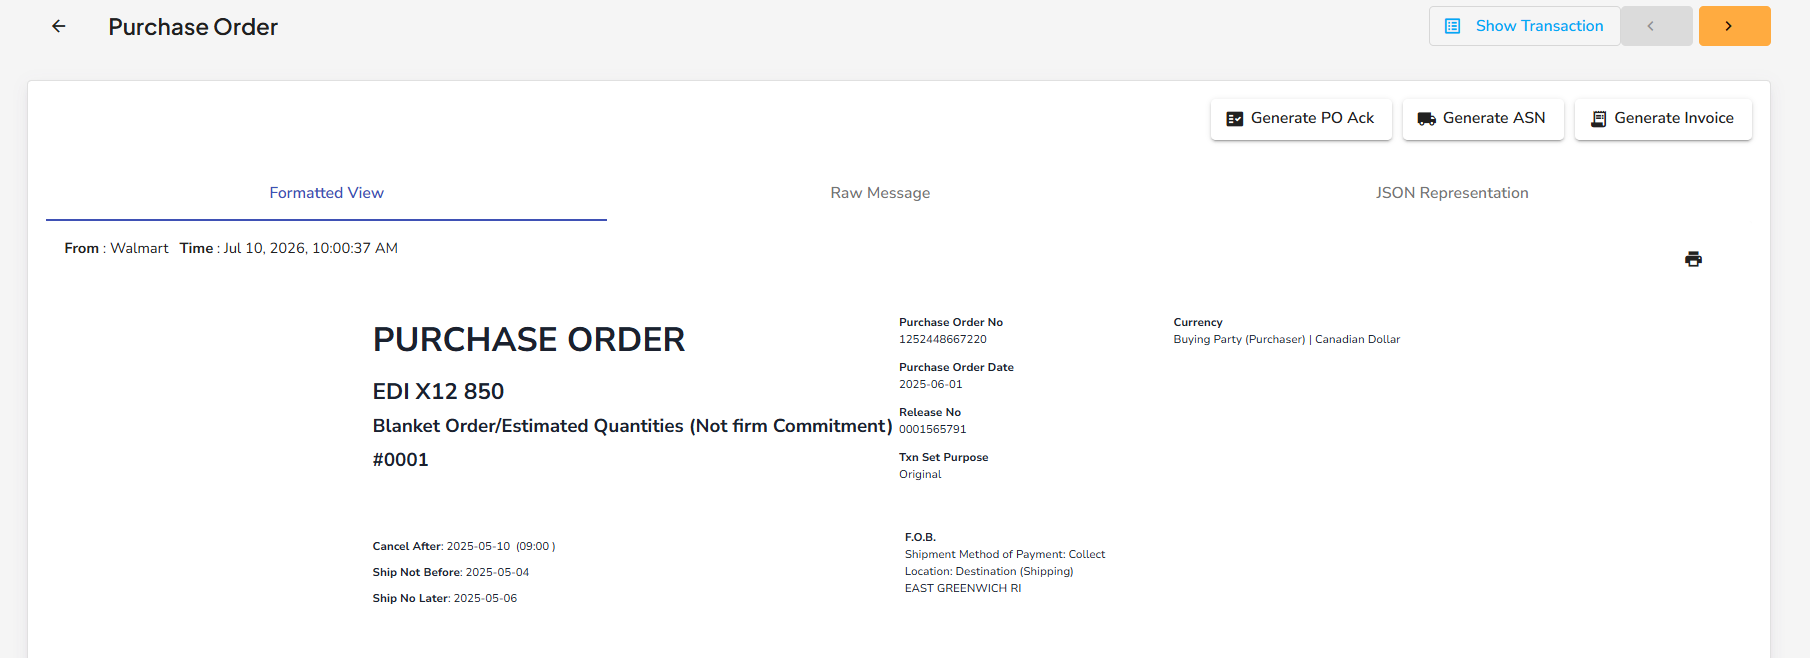
Generate PO Acknowledgment (EDI 855)
If required by your trading partner, you should acknowledge receipt and acceptance status of the order.
- Click Generate PO Ack (either from the list row dropdown or the detail page header).
- The EDI 855 editor will load, pre-populating partner IDs, reference numbers, and line items.
- Review and edit the items (you can accept items, note change requests, or reject items with appropriate reason codes).
- Click Validate and Save, then click Send.
- Once the PO Acknowledgment is successfully sent, the Status column of the PO list row will update to ACK Sent. Next to this status, the FA status icon will appear (showing a rotating yellow icon for FA Pending, a green check circle for FA Received - Accepted, or a warning/cancel icon if accepted with errors or rejected).
For a detailed, step-by-step walkthrough on how to create, validate, and send a PO Acknowledgment (including how to create one from scratch using a Walmart scenario), see Creating Purchase Order Acknowledgements (EDI 855).
Generate Advance Ship Notice (EDI 856)
When the goods are packed and ready to ship, you must send an Advance Ship Notice (ASN) before the shipment arrives at the buyer’s destination.
- Click Generate ASN (either from the list row dropdown or the detail page header).
- The EDI 856 editor will load, pre-populated with details from the PO.
- Organize the shipment structure into Shipment, Order, Tare (Pallet), Pack (Carton), and Item hierarchies as required.
- Validate and send the ASN.
- Once the ASN is successfully sent, the Status column of the PO list row will update to ASN Sent, accompanied by its FA status icon.
- Once sent, navigate to the ASN list to print corresponding Shipping Labels (including SSCC-18 barcodes) and Packing Slips.
For a detailed, step-by-step walkthrough on how to create, validate, and send an Advance Ship Notice (including how to build one from scratch using a Walmart scenario), see Creating Advance Ship Notices (EDI 856).
Generate Invoice (EDI 810)
After the requested goods/items have been delivered, you can request payment by generating and sending an invoice.
- Click Generate Invoice (either from the list row dropdown or the detail page header).
- The EDI 810 editor will load with billing details and line items pre-populated from the PO.
- Verify the pricing, quantities, tax, and invoice numbers.
- Click Validate and Save, then click Send.
- Once the Invoice is successfully sent, the Status column of the PO list row will update to Invoice Sent, accompanied by its Functional Acknowledgment (FA) status icon showing whether it has been accepted, is pending, or has errors.
For a detailed, step-by-step walkthrough on how to create, validate, and send an Invoice (including how to build one from scratch using a Walmart scenario), see Creating Invoices (EDI 810).
When generating any follow-up documents (PO Acknowledgments, ASNs, or Invoices) from a received Purchase Order, it is highly recommended to verify the correctness of all auto-populated data. You should also ensure that you manually add any relevant transaction details that were not auto-populated before validating and sending the document.
Automated QuickBooks Online Integration (Alternative)
If you have configured QuickBooks Online under External Integrations:
- The EDI Generator can automatically generate a draft invoice in your QuickBooks account whenever a PO is received from a configured partner.
- The integration maps PO items to your QuickBooks inventory items based on your configured mapping rules.
- You can re-process existing POs to trigger this synchronization by using the Process Again option in the Inbox three-dot menu.