
Creating Invoices (EDI 810)
The Invoice (EDI 810) is a transaction sent by a supplier to a buyer to request payment for goods delivered or services rendered. In modern retail supply chains, invoicing electronically is a critical step in completing the order fulfillment cycle.
This guide walks you through two methods of creating an EDI 810 in the EDI Generator, with a focus on creating one from scratch using a real-world Walmart partner scenario.
Pre-populating from a Received PO
If you have already received the Purchase Order in the EDI Generator, you do not need to enter all the fields manually:
- Navigate to the received PO in your Inbox or PO (or Retail > PO) list.
- Open the PO formatted view, or click the Generate button at the end of the PO row.
- Click Generate Invoice.
- The system will load the EDI 810 editor pre-populated with details matching the original Purchase Order:
- Header Information: Sets the original Purchase Order Number and PO Date (
BIGsegment), and reference numbers like the Internal Vendor Number (REF*IA). - Party Locations: Copies Ship-To (
ST) and Supplier (SU) GLNs and addresses. - Payment Terms: Pre-populates the Terms of Sale (
ITDsegment). - Item Details: Pre-populates quantities invoiced, units of measure, unit pricing (
IT1segment), and item descriptions (PIDsegment).
- Header Information: Sets the original Purchase Order Number and PO Date (
For more details, see Processing Purchase Orders (EDI 850).
Creating an EDI 810 from Scratch
If you need to initiate an Invoice manually without a received PO, follow these steps using our sample Walmart scenario.
Scenario Context
- Partner: Walmart
- Invoice Number:
INV-987654 - Invoice Date: Current Date
- PO Number:
1252448667 - PO Date:
2026-07-18 - Department Number:
00543 - Merchandise Type Code:
0123 - Item: Quantity
100Cases at Unit Price$15.50
Start Invoice Creation
- In the side menu, navigate to Invoice (or Retail > Invoice if nested).
- Click the Create button in the top-right corner.
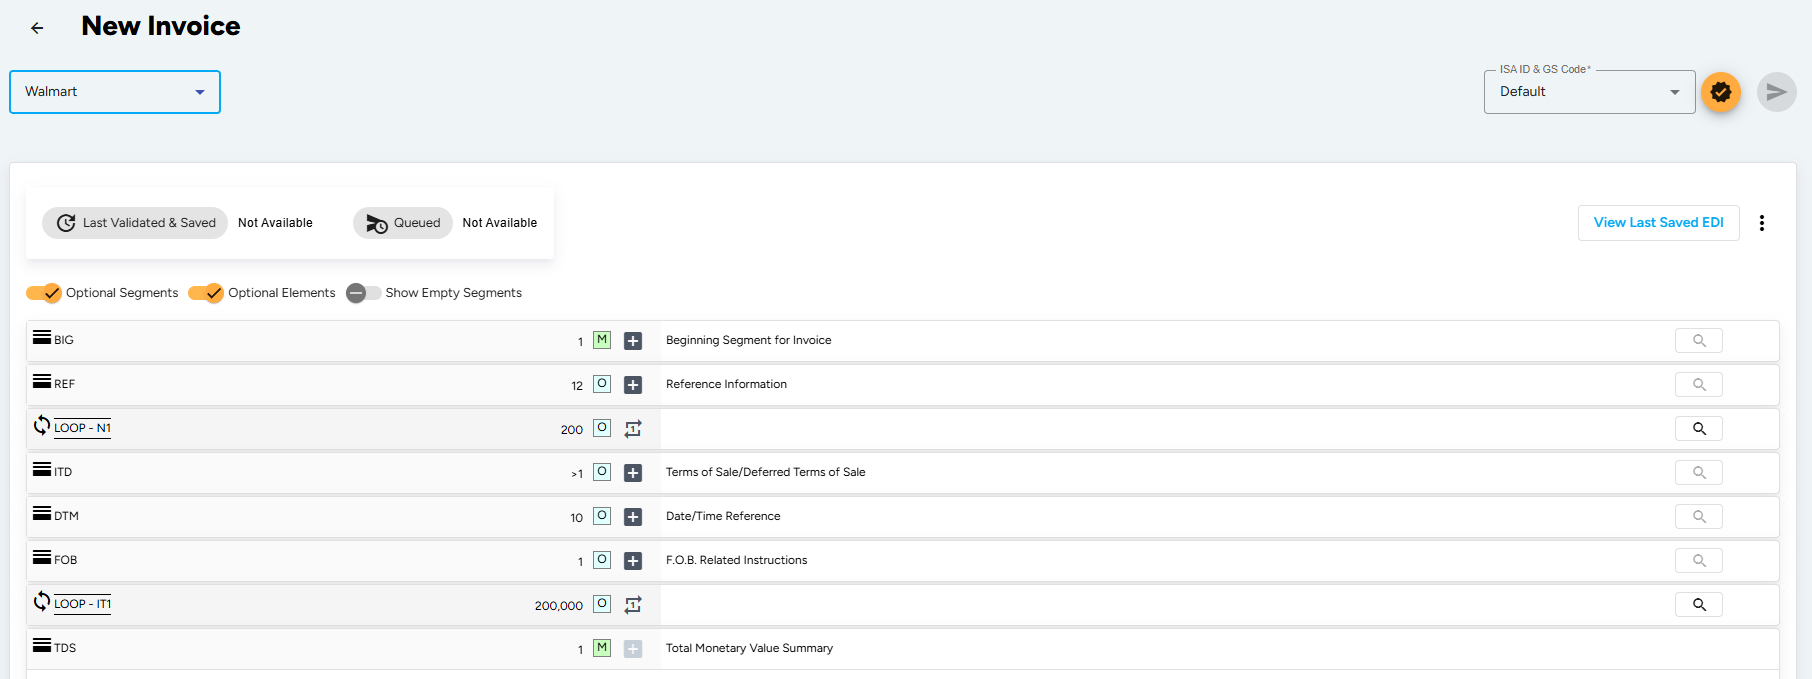
- Select your partner (e.g., Walmart) from the dropdown.
- The EDI editor will load the structure for the 810 document.
For a detailed guide on how the EDI Editor interface works (including how to add segment iterations, use Basic or Advanced loop modes, and locate validation errors), see Create New EDI File.
Enter Invoice Beginning Details (BIG Segment)
The BIG segment starts the invoice and links it to the original Purchase Order:
- Invoice Date (BIG01): Select the current creation date.
- Invoice Number (BIG02): Enter your unique invoice number.
- PO Date (BIG03): Select the original Purchase Order date.
- Purchase Order Number (BIG04): Enter the original 10-digit Walmart PO number.
- Transaction Type Code (BIG07): Select
CT(Cost Type Invoice) orCN(Credit Invoice) as appropriate.
Enter Reference Information (REF Segment)
The REF segment provides key identifiers that Walmart requires to route the invoice to the correct buying group.
- Add iterations on the REF segment row to add the required qualifiers:
- Department Number:
- Qualifier (REF01): Select
DP(Department Number). - Reference ID (REF02): Enter your 5-digit Walmart department number (e.g.,
00543).
- Qualifier (REF01): Select
- Internal Vendor Number:
- Qualifier (REF01): Select
IA(Internal Vendor Number). - Reference ID (REF02): Enter your 9-digit Walmart vendor code.
- Qualifier (REF01): Select
- Merchandise Type:
- Qualifier (REF01): Select
MR(Merchandise Type Code). - Reference ID (REF02): Enter your 4-digit merchandise type code.
- Qualifier (REF01): Select
- Department Number:
Define Party Identification (N1 Loop)
The N1 Loop contains address information for the transaction.
- Locate the N1 Loop in the editor.
- Ship To (ST):
- Entity Identifier Code (N101): Select
ST(Ship To). - Name (N102): Enter the name of the Walmart Distribution Center.
- Qualifier (N103): Select
UL(Global Location Number - GLN). - Identification Code (N104): Enter the 13-digit GLN for the Walmart shipping destination.
- N3 / N4 Address Segments: Fill in the physical street address, city, state, zip code, and country for the Ship-To location.
- Entity Identifier Code (N101): Select
- Supplier/Manufacturer (SU):
- Add another iteration to add the supplier details.
- Entity Identifier Code (N101): Select
SU(Supplier/Manufacturer). - Name (N102): Enter your supplier business name.
- N3 / N4 Address Segments: Fill in your company’s physical address.
Enter Terms of Sale (ITD Segment)
The ITD segment defines the payment terms and discounts:
- Terms Type Code (ITD01): Select the code mapping to your terms (e.g.,
05Discount Not Applicable,08Basic Discount Offered, or02End of Month). - Terms Basis Date Code (ITD02): Select the date from which terms are calculated.
- Terms Discount Percent (ITD03): Enter the discount percentage (if applicable).
- Terms Discount Days Due (ITD05): Enter the number of days discount is valid.
- Terms Net Days (ITD07): Enter the number of days net payment is due.
Configure Dates, Carrier, and Shipment Summary (DTM, CAD, FOB, ISS Segments)
These segments provide shipment details:
- Dates (DTM): Select qualifier
011(Shipped) and enter the shipped date. - Shipment Payment (FOB): Select payment method
PP(Prepaid) orCC(Collect). - Carrier Details (CAD): Select transportation type
T(Best Way), enter your carrier’s Standard Carrier Alpha Code (SCAC), routing details, and reference BOL/PRO number. - Shipment Summary (ISS Loop):
- Number of Units Shipped (ISS01): Enter the total number of units shipped.
- UOM (ISS02): Select the unit of measure (e.g.
EAorCA). - Weight (ISS03) / Weight Unit (ISS04): Fill in the total shipment weight and unit (
LBorKG).
Add Invoice Line Items (IT1 Loop)
The IT1 Loop is where you detail the items being invoiced:
- Locate the IT1 Loop and enter the first line details:
- Quantity Invoiced (IT102): Enter the quantity (e.g.,
100). - UOM (IT103): Select the unit of measure such as
CA(Case). - Unit Price (IT104): Enter the unit price (e.g.,
15.50). - Product/Service ID Qualifier (IT106): Select
IN(Buyer’s Item Number). - Product/Service ID (IT107): Enter the 9-digit Walmart item code.
- Product/Service ID Qualifier (IT108): Select
UP(UCC-12). - Product/Service ID (IT109): Enter the 12-digit UPC code.
- Quantity Invoiced (IT102): Enter the quantity (e.g.,
- Product Description (PID Segment):
- Item Description Type (PID01): Select
F(Free-form). - Description (PID05): Enter the product name.
- Item Description Type (PID01): Select
- Item Physical Details (PO4 Segment):
- Pack (PO401): Enter the quantity per case (e.g.,
12units per case).
- Pack (PO401): Enter the quantity per case (e.g.,
- Allowance or Charges (SAC Loop under IT1 - Optional):
- If there are item-level discounts, credits, or charges (such as a pallet charge or trade allowance), expand this loop and specify the Allowance/Charge Indicator (
SAC01), Service Code (SAC02), and Amount (SAC05).
- If there are item-level discounts, credits, or charges (such as a pallet charge or trade allowance), expand this loop and specify the Allowance/Charge Indicator (
Set Invoice Totals and Taxes (TDS, TXI, CTT Segments)
These segments wrap up the invoice amounts:
- Total Monetary Value (TDS Segment):
- Amount (TDS01): By default, the EDI Generator automatically calculates the total invoice amount based on the quantities, unit prices, allowances, and taxes entered in the other segments. To manually override this total, uncheck the Enable Auto Calculation checkbox on the TDS segment.
- Tax Information (TXI Segment - Optional):
- Tax Type Code (TXI01): Select the tax type (e.g.,
STState Sales Tax orGSGoods and Services Tax). - Monetary Amount (TXI02) / Percentage (TXI03): Enter the tax amount and percentage.
- Tax Type Code (TXI01): Select the tax type (e.g.,
- Transaction Totals (CTT Segment):
- Number of Line Items (CTT01): By default, the EDI Generator automatically calculates this field based on the total number of
IT1item loops added to the invoice. - If you need to override this:
- Expand the CTT segment row.
- Uncheck the Enable Auto Calculation checkbox.
- Manually enter or edit the Number of Line Items (CTT01) field.
- Number of Line Items (CTT01): By default, the EDI Generator automatically calculates this field based on the total number of
The segments and element rules detailed above represent a sample Walmart 810 specification scenario. Depending on your partner, the required qualifiers, tax codes, and net pricing formats can vary. The EDI Generator automatically aligns the editor form fields and validation rules to match whichever partner definition you select.
3. Validate, Save, and Send
- Once all details are filled, click the Validate and Save button in the top-right corner.
- The EDI Generator will check your document against the syntax and validation rules defined in the Walmart 810 specification.
- If there are validation errors, correct the pointed out segments and re-validate.
- Once the validation is successful, click Send to transmit the 810 Invoice to Walmart.