
Creating Advance Ship Notices (EDI 856)
The Advance Ship Notice (EDI 856), also known as the ASN, is a transaction sent by a supplier to a buyer to describe a pending shipment’s contents and physical structure (pallets, cartons, and items). Sending a timely and accurate ASN is a critical compliance requirement for major retailers like Walmart.
This guide walks you through two methods of creating an EDI 856 in the EDI Generator, with a focus on creating one from scratch using a real-world Walmart partner scenario.
Pre-populating from a Received PO
If you have already received the Purchase Order in the EDI Generator, you do not need to enter all the fields manually:
- Navigate to the received PO in your Inbox or PO (or Retail > PO) list.
- Open the PO formatted view, or click the Generate button at the end of the PO row.
- Click Generate ASN.
- The system will load the EDI 856 editor pre-populated with matching details from the original Purchase Order:
- Shipment Level (S): Sets the default hierarchical structure code (
0001under BSN05), payment terms (FOBsegment), and Ship-To / Ship-From addresses (N1loop). - Order Level (O): Pre-populates the buyer’s Purchase Order number and date (
PRFsegment). - Pack Level (P): Inserts placeholder carton barcodes to prompt you to input the correct carton SSCC barcodes.
- Item Level (I): Pre-populates line numbers, buyer SKU/UPC codes (
LINsegment), and ordered quantities/units of measure (SN1segment).
- Shipment Level (S): Sets the default hierarchical structure code (
For more details, see Processing Purchase Orders (EDI 850).
Creating an EDI 856 from Scratch
If you need to initiate an Advance Ship Notice manually without a received PO, follow these steps using our sample Walmart scenario.
Scenario Context
- Partner: Walmart
- Shipment ID (BOL):
987654321 - PO Number:
1252448667 - Carrier SCAC Code:
RDWY(Roadway Express) - Equipment: Trailer
TR-9954 - Seal Number:
SL-4422 - Pallet Barcode (SSCC):
00004548621458963574 - Carton Barcode (SSCC):
00004548621458963599 - Item: Buyer SKU
5486214(Quantity:10Cases)
Start ASN Creation
- In the side menu, navigate to ASN (or Retail > ASN if nested).
- Click the Create button in the top-right corner.
- Select your partner (e.g., Walmart) from the dropdown.
- The EDI editor will load the structure for the 856 document.
For a detailed guide on how the EDI Editor interface works (including how to add segment iterations, use Basic or Advanced loop modes, and locate validation errors), see Create New EDI File.
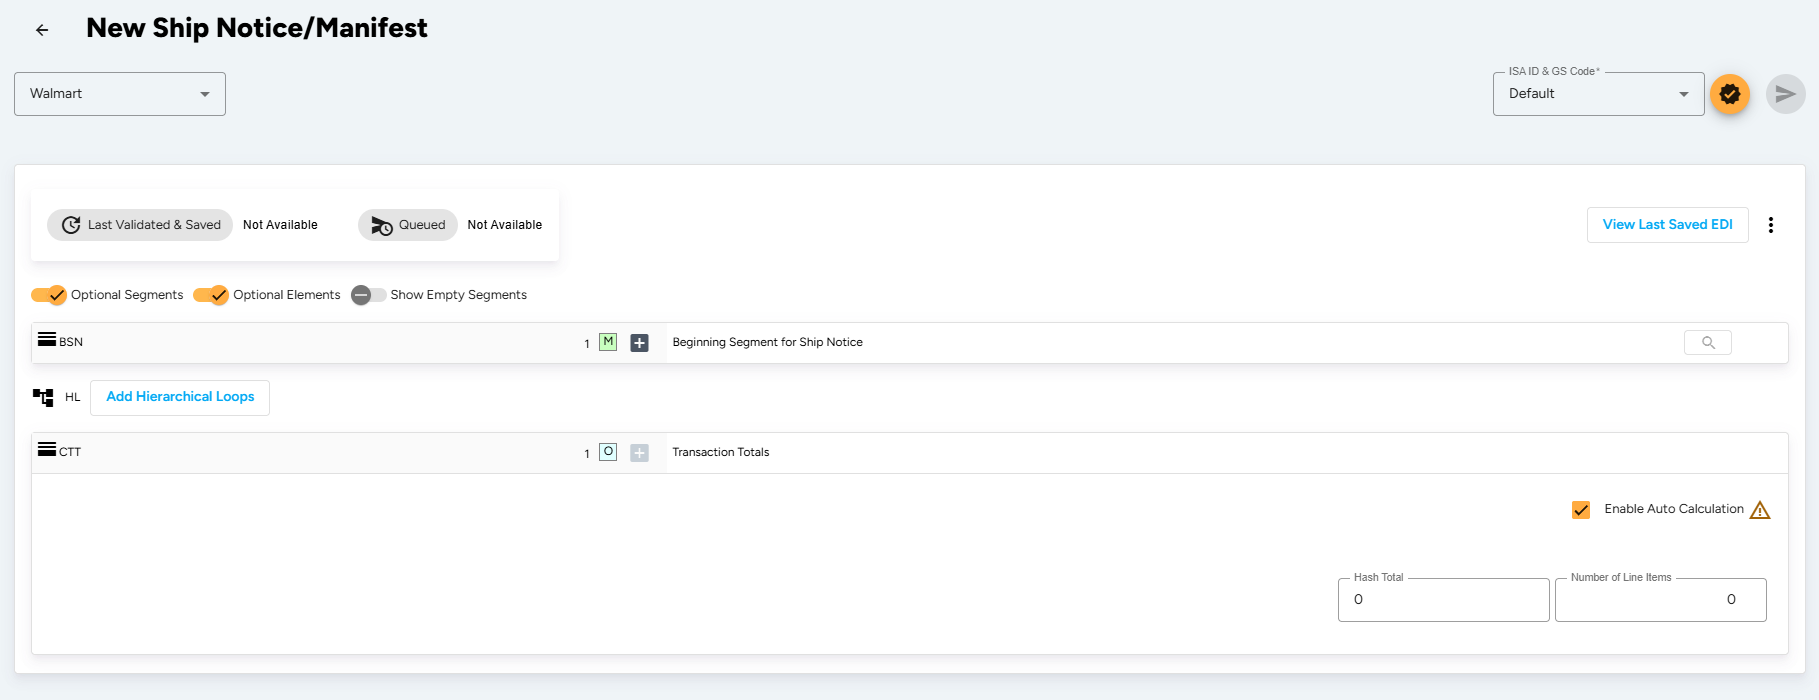
Enter Beginning Segment details (BSN Segment)
The BSN segment contains critical shipment identification and timestamping. Click on the BSN segment row in the editor to open its fields:
- Transaction Set Purpose Code (BSN01): Select
00(Original) to send a new shipment notification. - Shipment Identification (BSN02): Enter the unique shipment identification number.
- Date (BSN03): Select the current creation date.
- Time (BSN04): Enter the current creation time in HHMM format.
- Hierarchical Structure Code (BSN05): Select the code defining your packaging layout hierarchy:
0001(Shipment, Order, Packaging, Item) or0002(Shipment, Order, Item, Packaging) if shipping with packaging levels (pallets and cartons).0004(Shipment, Order, Item) if shipping items directly under the order without packaging levels. Selecting0004means you will completely skip the optional Tare (Pallet) and Pack (Carton) hierarchical levels.
Initialize the Hierarchical Loop Structure
When creating an ASN from scratch, the hierarchical levels do not exist in the editor by default. You must initialize the structure:
- Locate the HL section underneath the BSN segment.
- Click the Add Hierarchical Loops button and select Shipment from the dropdown menu to insert the top-level Shipment (HL:03=S) loop block.
- Click the
+(Add child HL) button on the newly added Shipment block, and select Order from the dropdown menu to insert the Order (HL:03=O) loop block. - Click the
+button on the Order block, and select Pack (or Tare first if you are using pallets) to insert the next levels, nesting them down to the Item (HL:03=I) level as required by your shipment structure.
Make sure to add child loops in the exact sequence required by your Hierarchical Structure Code (e.g.,
0001or0002specified inBSN05).
Configure Hierarchical Level - Shipment (HL:03=S)
The HL:03=S segment starts the shipment-level information, describing the carrier, routing, and transit details.
- Expand the HL:03=S (Shipment) block that you initialized.
- Carrier Details (TD1):
- Weight Qualifier (TD106): Select the weight qualifier such as
G(Gross Weight). - Weight (TD107): Enter the weight.
- Weight Unit (TD108): Select the weight unit such as
LB(Pound).
- Weight Qualifier (TD106): Select the weight qualifier such as
- Carrier Routing (TD5):
- Identification Code Qualifier (TD502): Select
2(Standard Carrier Alpha Code - SCAC). - Identification Code (TD503): Enter the carrier’s SCAC code (e.g.,
RDWY). - Transportation Method (TD504): Select the transportation method such as
M(Motor - Common Carrier) orLT(Less Than Trailer Load - LTL).
- Identification Code Qualifier (TD502): Select
- Equipment (TD3):
- Equipment Description Code (TD301): Select
TL(Trailer). - Equipment Number (TD303): Enter the trailer number (e.g.,
TR-9954). - Seal Number (TD309): Enter the seal number (e.g.,
SL-4422).
- Equipment Description Code (TD301): Select
- Reference Information (REF):
- Qualifier (REF01): Select
BM(Bill of Lading Number). - Reference ID (REF02): Enter the BOL number.
- Qualifier (REF01): Select
- Shipped Dates (DTM):
- Date/Time Qualifier (DTM01): Select
011(Shipped). - Date (DTM02): Select the date shipped.
- Date/Time Qualifier (DTM01): Select
- Shipment Method of Payment (FOB):
- Payment Code (FOB01): Select
CC(Collect) orPP(Prepaid).
- Payment Code (FOB01): Select
- Party Identification (N1 Loop):
- Ship To (ST):
- Entity Identifier Code (
N101): SelectST(Ship To). - Name (
N102): EnterWalmart Distribution Center. - Qualifier (
N103): SelectUL(GLN). - ID Code (
N104): Enter the 13-digit GLN for the Walmart distribution center.
- Entity Identifier Code (
- Ship From (SF):
- Add another iteration to add the supplier location.
- Entity Identifier Code (
N101): SelectSF(Ship From). - Name (
N102): Enter your supplier name. - Address (
N3) / Geo Location (N4): Fill in the shipping warehouse address details.
- Ship To (ST):
Configure Hierarchical Level - Order (HL:03=O)
The Order level references the original Purchase Order. All hierarchical level IDs are automatically generated.
- Expand the HL:03=O segment.
- Purchase Order Reference (PRF):
- Purchase Order Number (PRF01): Enter the original 10-digit Walmart PO number (e.g.,
1252448667).
- Purchase Order Number (PRF01): Enter the original 10-digit Walmart PO number (e.g.,
- Reference Information (REF):
- Qualifier (REF01): Select reference qualifer such as
IA(Internal Vendor Number). - Reference ID (REF02): If
IAis selected, enter your 9-digit Walmart vendor code.
- Qualifier (REF01): Select reference qualifer such as
Configure Hierarchical Level - Tare (HL:03=T)
If shipping on pallets (Tare level), expand this loop.
- Expand the HL:03=T segment.
- Marks and Numbers Information (MAN):
- Qualifier (MAN01): Select
GM(SSCC-18 and Application Identifier). - Marks and Numbers (MAN02): Enter the 20-digit Serial Shipping Container Code (SSCC) for the pallet (e.g.,
00004548621458963574).
- Qualifier (MAN01): Select
Configure Hierarchical Level - Pack (HL:03=P)
If shipping in individual cartons (Pack level), expand this loop.
- Expand the HL:03=P segment.
- Marks and Numbers Information (MAN):
- Qualifier (MAN01): Select
GM. - Marks and Numbers (MAN02): Enter the 20-digit carton SSCC code (e.g.,
00004548621458963599).
- Qualifier (MAN01): Select
Configure Hierarchical Level - Item (HL:03=I)
The Item level describes the actual products contained inside the parent level.
- Expand the HL:03=I segment.
- Item Identification (LIN):
- Product/Service ID Qualifier (LIN02): Select
IN(Buyer’s Item Number). - Product/Service ID (LIN03): Enter the 9-digit item code (e.g.,
005486214). - Product/Service ID Qualifier (LIN04): Select
UP(UCC-12). - Product/Service ID (LIN05): Enter the 12-digit UPC code.
- Product/Service ID Qualifier (LIN02): Select
- Number of Units Shipped (SN1):
- Number of Units Shipped (SN102): Enter the quantity shipped.
- Unit or Basis for Measurement Code (SN103): Select
EA(Each) orCA(Case) to match the shipping unit.
- Product/Item Description (PID):
- Item Description Type (PID01): Select
F(Free-form). - Description (PID05): Enter the product name/description.
- Item Description Type (PID01): Select
Set Transaction Totals (CTT Segment)
By default, the EDI Generator automatically calculates the totals for the CTT segment to prevent manual counting errors:
- Number of Line Items (CTT01): Auto-calculated based on the total number of
HLloops defined in the document. - Hash Total (CTT02): Automatically calculated by summing up the quantities (from the SN1 segment) if the selected partner’s specification includes the CTT02 element.
If you need to manually override the line count:
- Expand the CTT segment row.
- Uncheck the Enable Auto Calculation checkbox.
- Manually enter or edit the Number of Line Items (CTT01) field.
The segments and element rules detailed above represent a sample Walmart 856 specification scenario. Depending on your partner, the required qualifiers, hierarchical structure code, and mandatory elements can vary. The EDI Generator automatically aligns the editor form fields and validation rules to match whichever partner definition you select.
3. Validate, Save, and Send
- Once all details are filled, click the Validate and Save button in the top-right corner.
- The EDI Generator will check your document against the syntax and validation rules defined in the Walmart 856 specification.
- If there are validation errors, correct the pointed out segments and re-validate.
- Once the validation is successful, click Send to transmit the 856 Advance Ship Notice to Walmart over AS2/SFTP.
After sending the shipping notice and dispatching your carrier, the final step in the cycle is requesting payment. See Creating Invoices (EDI 810) for instructions on creating the invoice.