Creating an AS2 Station
1 What is an AS2 Station
An AS2 ‘Station’ defines an identity for your Organization to communicate over the AS2 protocol. An AS2 Station will have a unique AS2 ID, URL, and a certificate used for encryption and digital signatures. While most organizations would be using just one AS2 Station, some advanced users may prefer to use two or more stations. Some large organizations may decide to create two stations to use one for testing, and the other for production use.
2 Creating an AS2 Station
An AS2 Station is analogous to an email address. A significant aspect is the ‘AS2 ID’, which is a unique identifier you would choose to identify your AS2 identity. If your company name is Acme Trading, you may choose ‘ACME_PROD’ as an example of your AS2 identifier. You will receive messages from your Partners destined to a specific AS2 ID, and if you have more than one Station, the messages will show to which Stations they have been received. Similarly, when sending out messages, you can choose the outgoing Station to be used, if you have more than one Station created for your Organization.
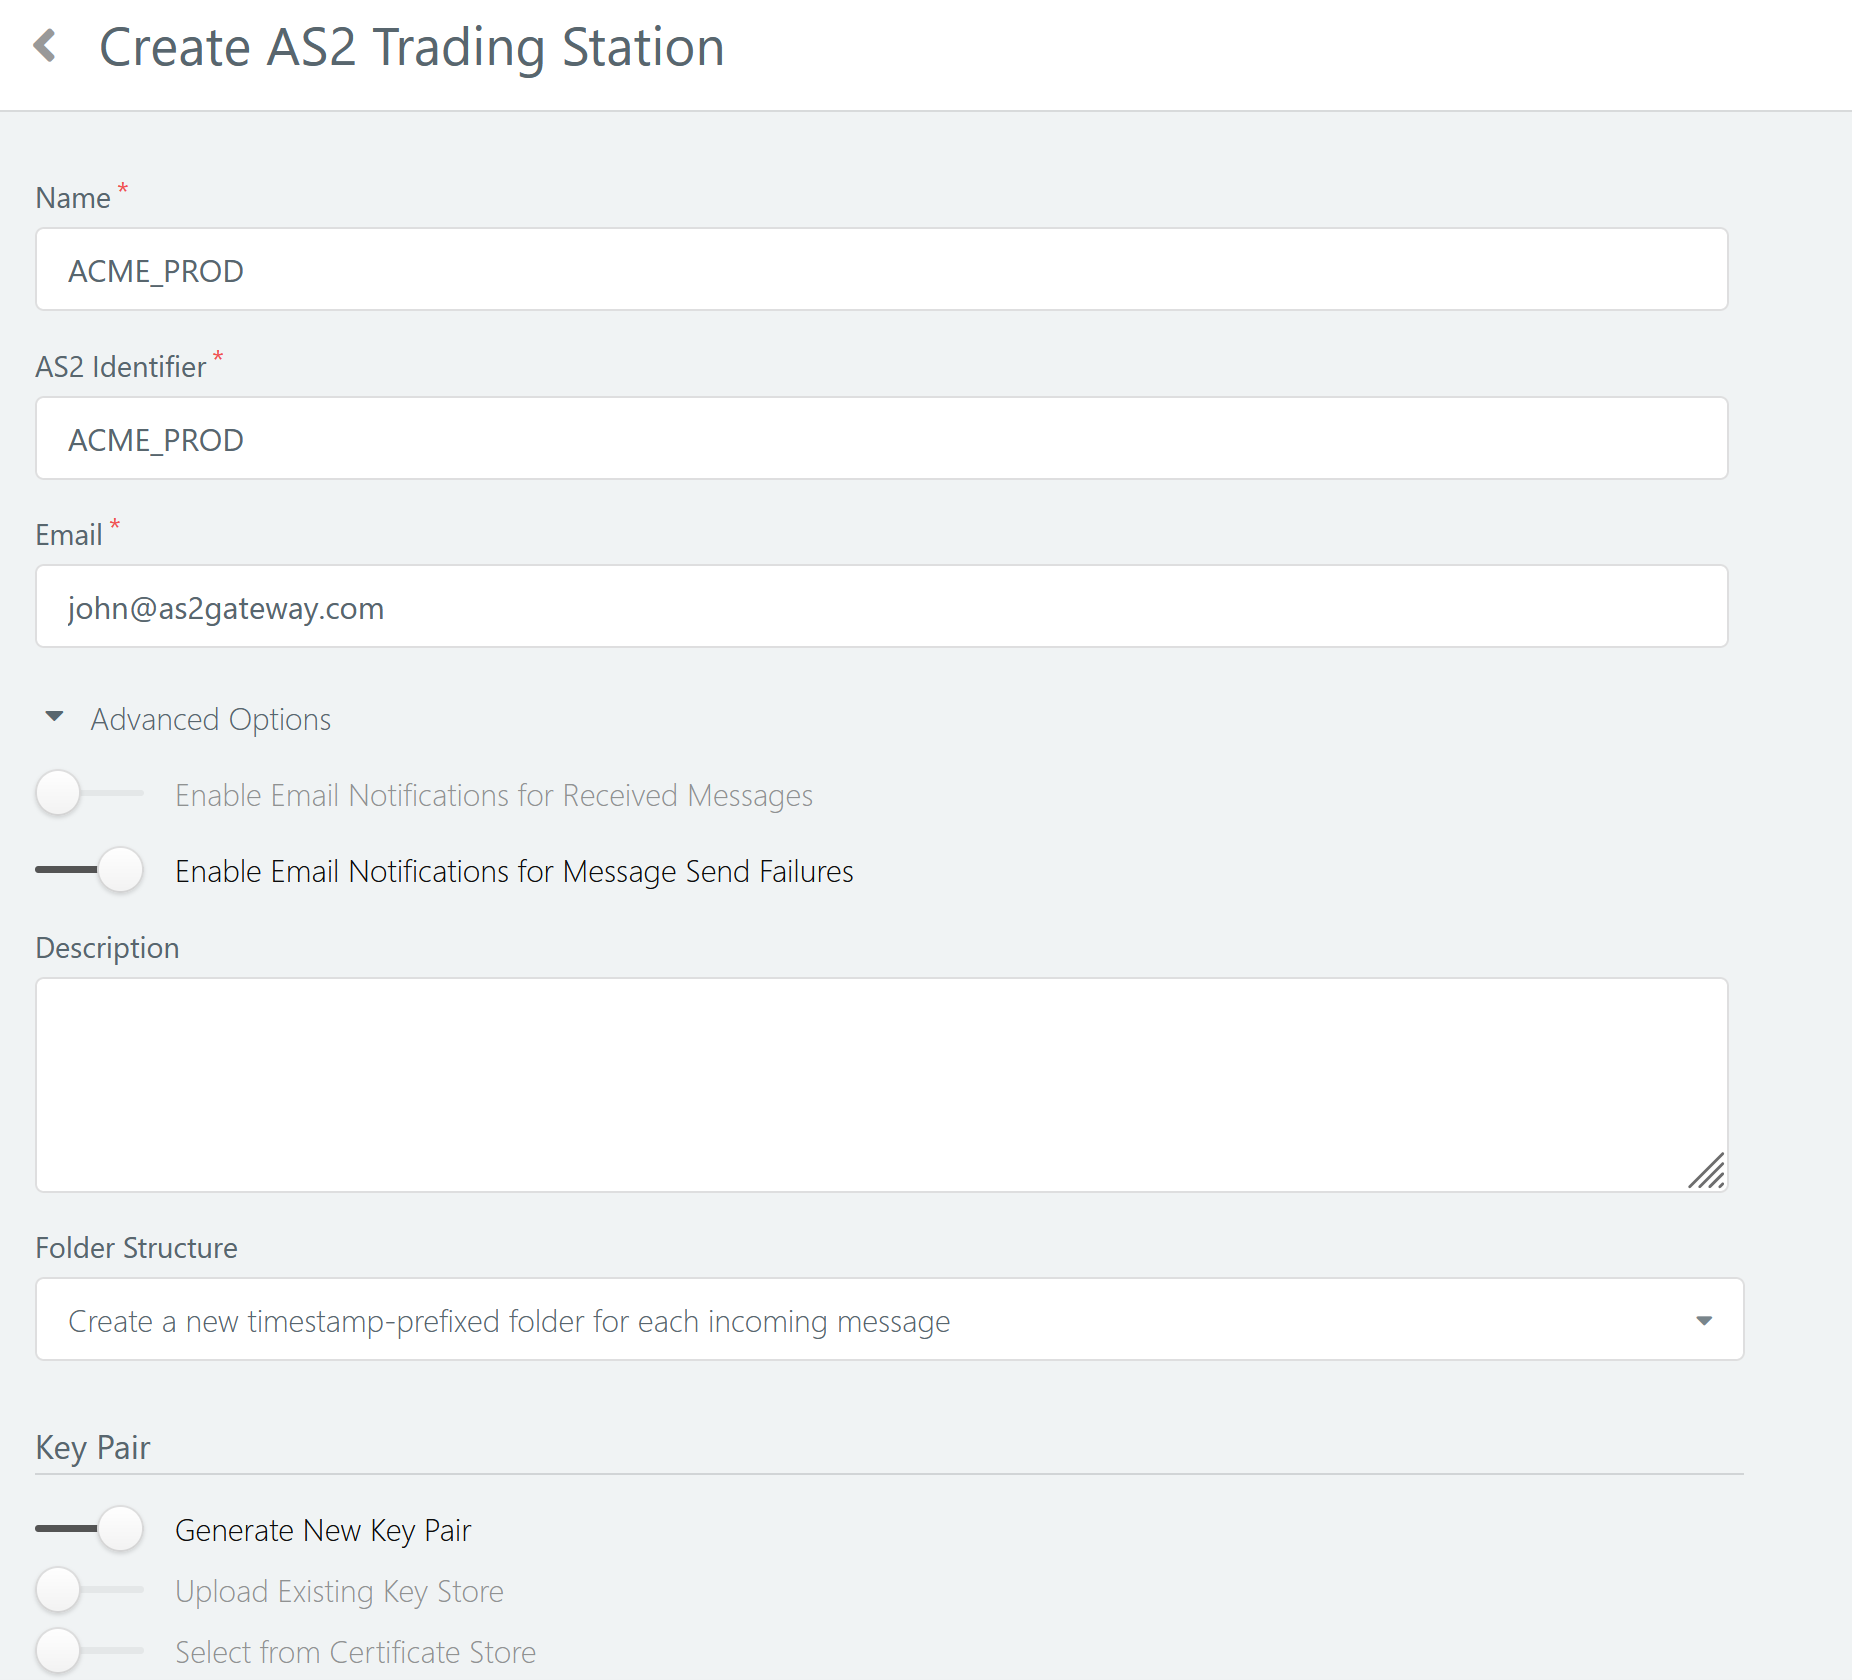
To create a new Station, navigate to the Stations page from the navigation menu. Then click on the ‘New Station’ button.

2.1 Basic information for the Station
To add the trading station:
- Specify a name for the trading station. This is solely used for labeling the station within AS2 Gateway, with a user-friendly name. This name will not be used in AS2 message communication. So specify a descriptive name such as ‘Acme AS2 Production’. For any reason, if you decide to use some external identifier say ‘08111999US00’ as your AS2 ID (specified next), this ‘name’ will be easier to relate to.
Specify an AS2 identifier. This is the identifier used to identify the AS2 Gateway station, analogous to an email address, and used within in AS2 message communication. This has to be unique among a set of agreed partners, and also within AS2 Gateway service (which the Gateway will ensure at creation time).
Note: Spaces, backslashes or double quotes are not allowed in the station AS2 identifier. Its length should be between 1 and 128 characters (inclusive).
- Specify an email address for the station. It will be used in
Fromheader of sent messages (notAS2-From- which is the AS2 identifier). It will also be used to send email notifications to you regarding the station, such as incoming messages or sending failures. - Under ‘Advanced Options’, choose if you would like to receive an email notification on receipt of each AS2 message to this station. You can also enable email notifications for send failures. e.g. where a Partner endpoint has been unavailable to accept a queued message, and all automatic retries have failed. Email notifications might not be of much use, when large amounts of messages are received every day. Each such notification email will include a header
X-AS2-Message-IDindicating the AS2 message ID, so that email processing rules could be implemented. - You can then select the folder structure and file naming to be used. There are three options available as shown below. Refer Folder and File Structure for more information.
- Create a new timestamp-prefixed folder for each incoming message
- Store incoming files at inbox root, adding a timestamp-based unique prefix to its original name
- Store incoming files at inbox root (WARNING: newer files may overwrite older files with same name!)
- The default and recommended option is the first, where each new message will have its own timestamp-prefixed folder. If multiple files are sent, all of them will be available within that folder. With the second option, the files will be placed at the inbox root folder always, but a timstamp-based unique prefix is added to each file so that the name will not be duplicated. The third option places all files into the inbox root folder, and may overwrite older files, if the source files do not contain a timestamp or other prefix to make them unique.

2.2 Certificate configuration
Next, configure the certificate details for your Station. The following screen shows the generation and use of a self-signed certificate, which is the most common option used by most organizations. AS2 certificates does not require a third party Certification Authority (CA) to sign certificates. However, users can choose to get the certificates signed, if the remote Partners require it. Using self-signed certificates incur no additional costs, such as the charges by third party CA’s, which charge fees for certificate signing.
If you already have a keystore containing a key-pair and certificate, you may choose to upload it by sliding the ‘Upload Existing Key Store’ option. If you have already imported such a key-pair and certificate previously, you can select the entry from your certificate store by sliding the ‘Select from Certificate Store’ option.

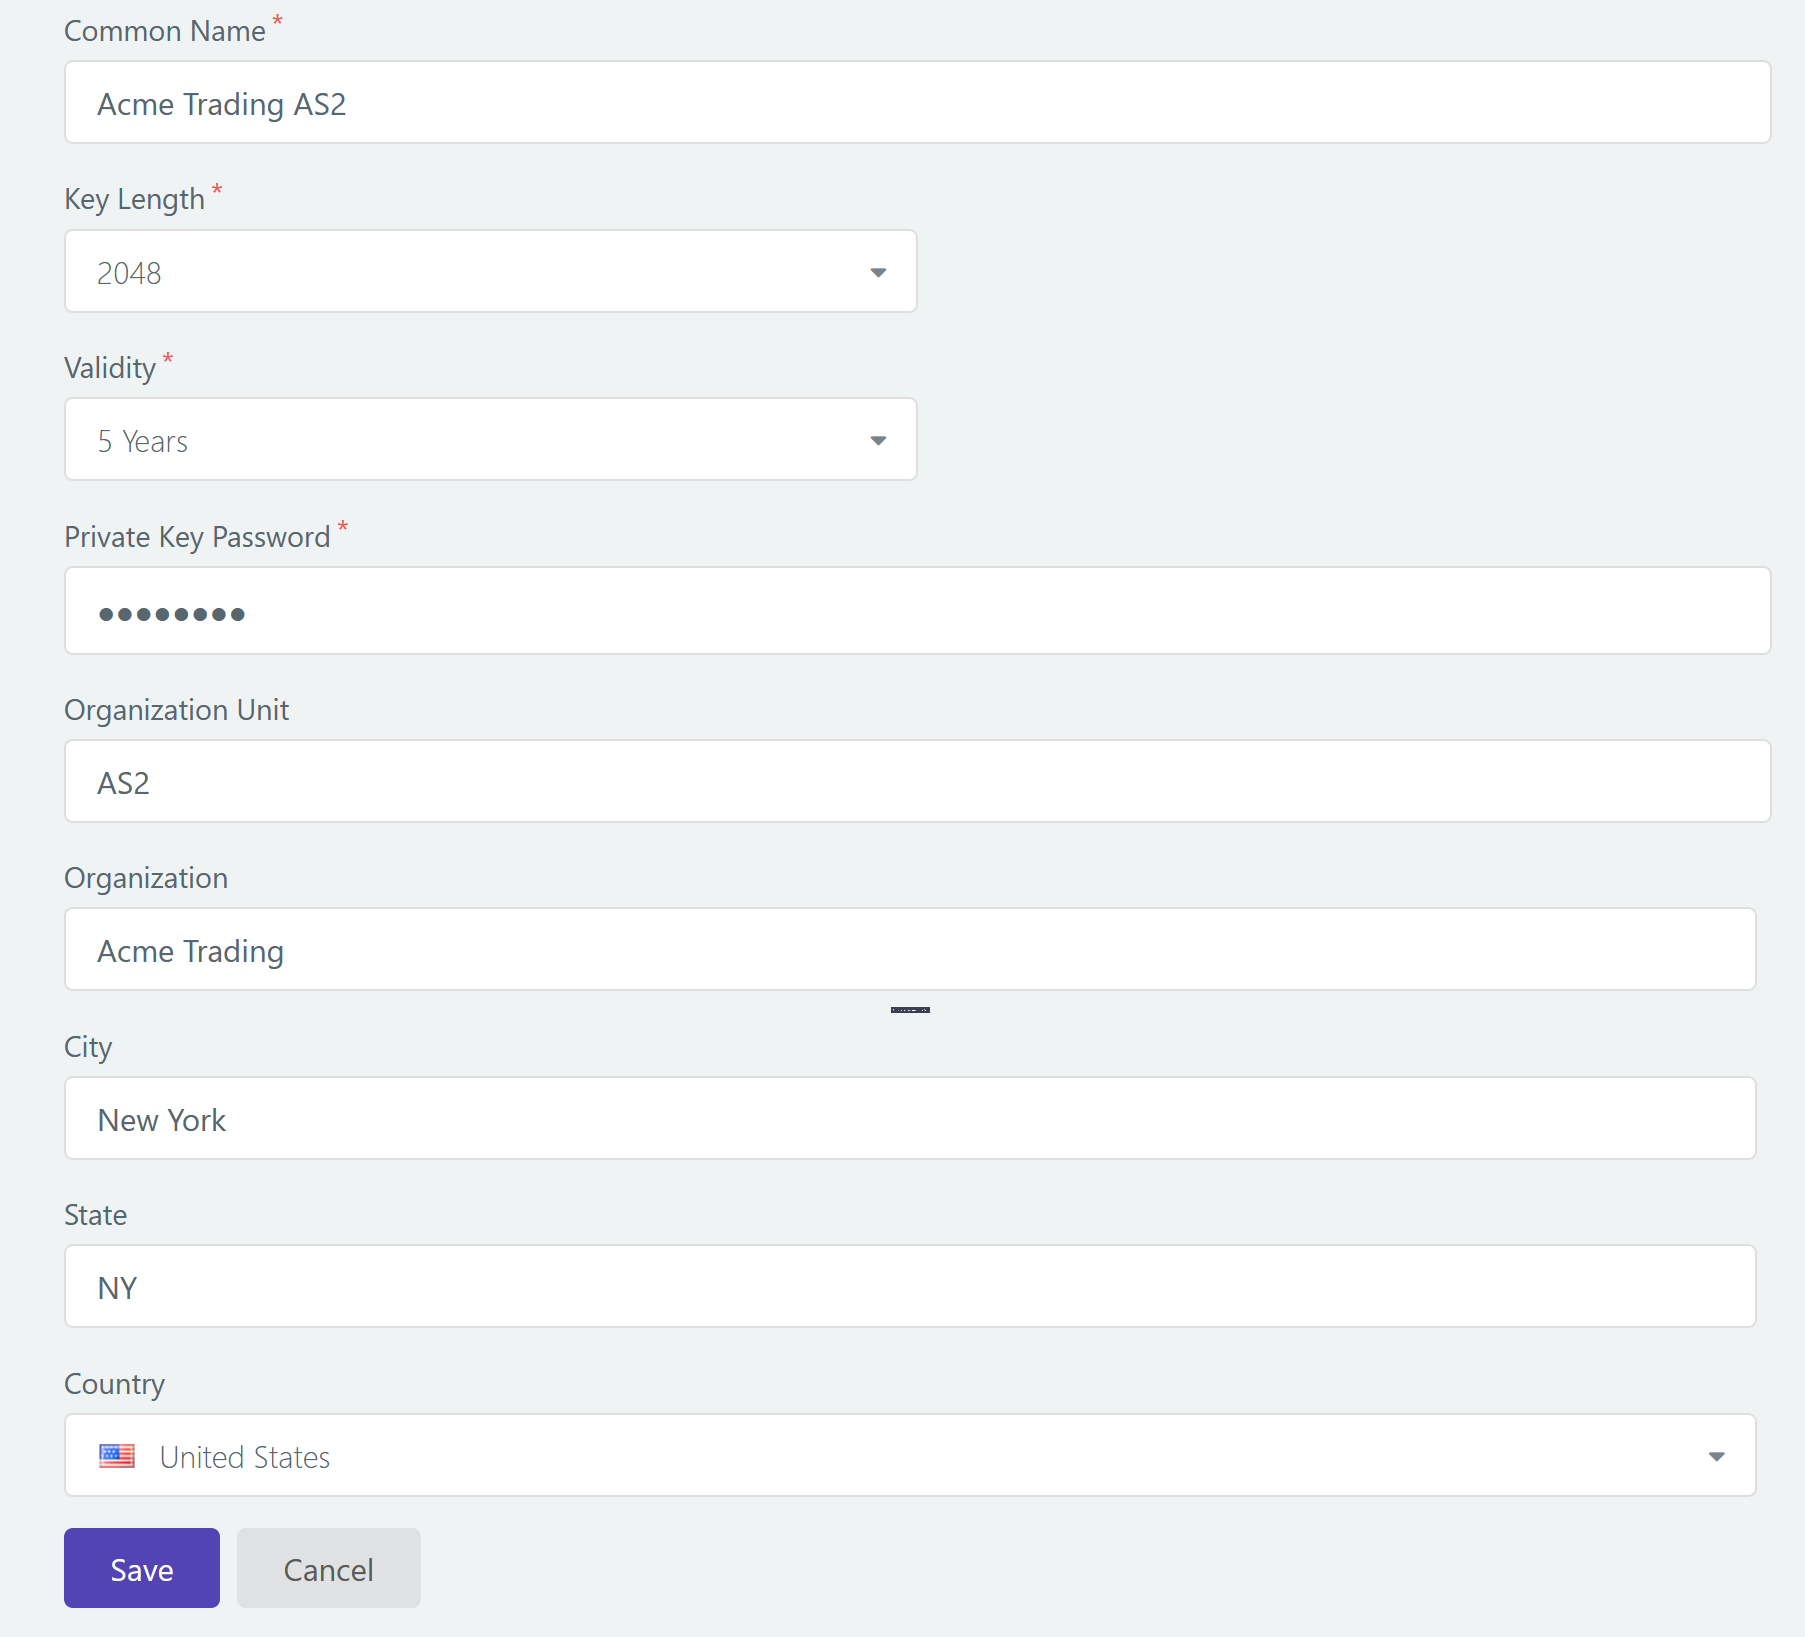
Note: These fields follow the general certificate attributes as defined in RFC 5280.
- Specify a common name for the new certificate. This can be your name or domain name; for example, “John Doe” or “www.acme.com”.
- Specify your organization unit. This can be something like a division or department name in your organization; for example, “Information Technology”.
- Specify your organization. This can be your company name; for example, “Acme Ltd.”.
- Specify your city; for example, “Houston”.
- Specify a state; for example, “Texas”
- Select your country from the drop-down list.
- Select a preferred key length.
- Select the certificate validity period. Once this period has expired, you would need to regenerate a new certificate and share it with your partners again.
- Enter a password for the certificate.
Note: It is recommended to leave the key length at 2048, and the validity at 5 years, unless you have any specific reasons.
Once the certificate configuration is complete, go ahead and submit the form by clicking on the Save button.
3 AS2 Station Listing
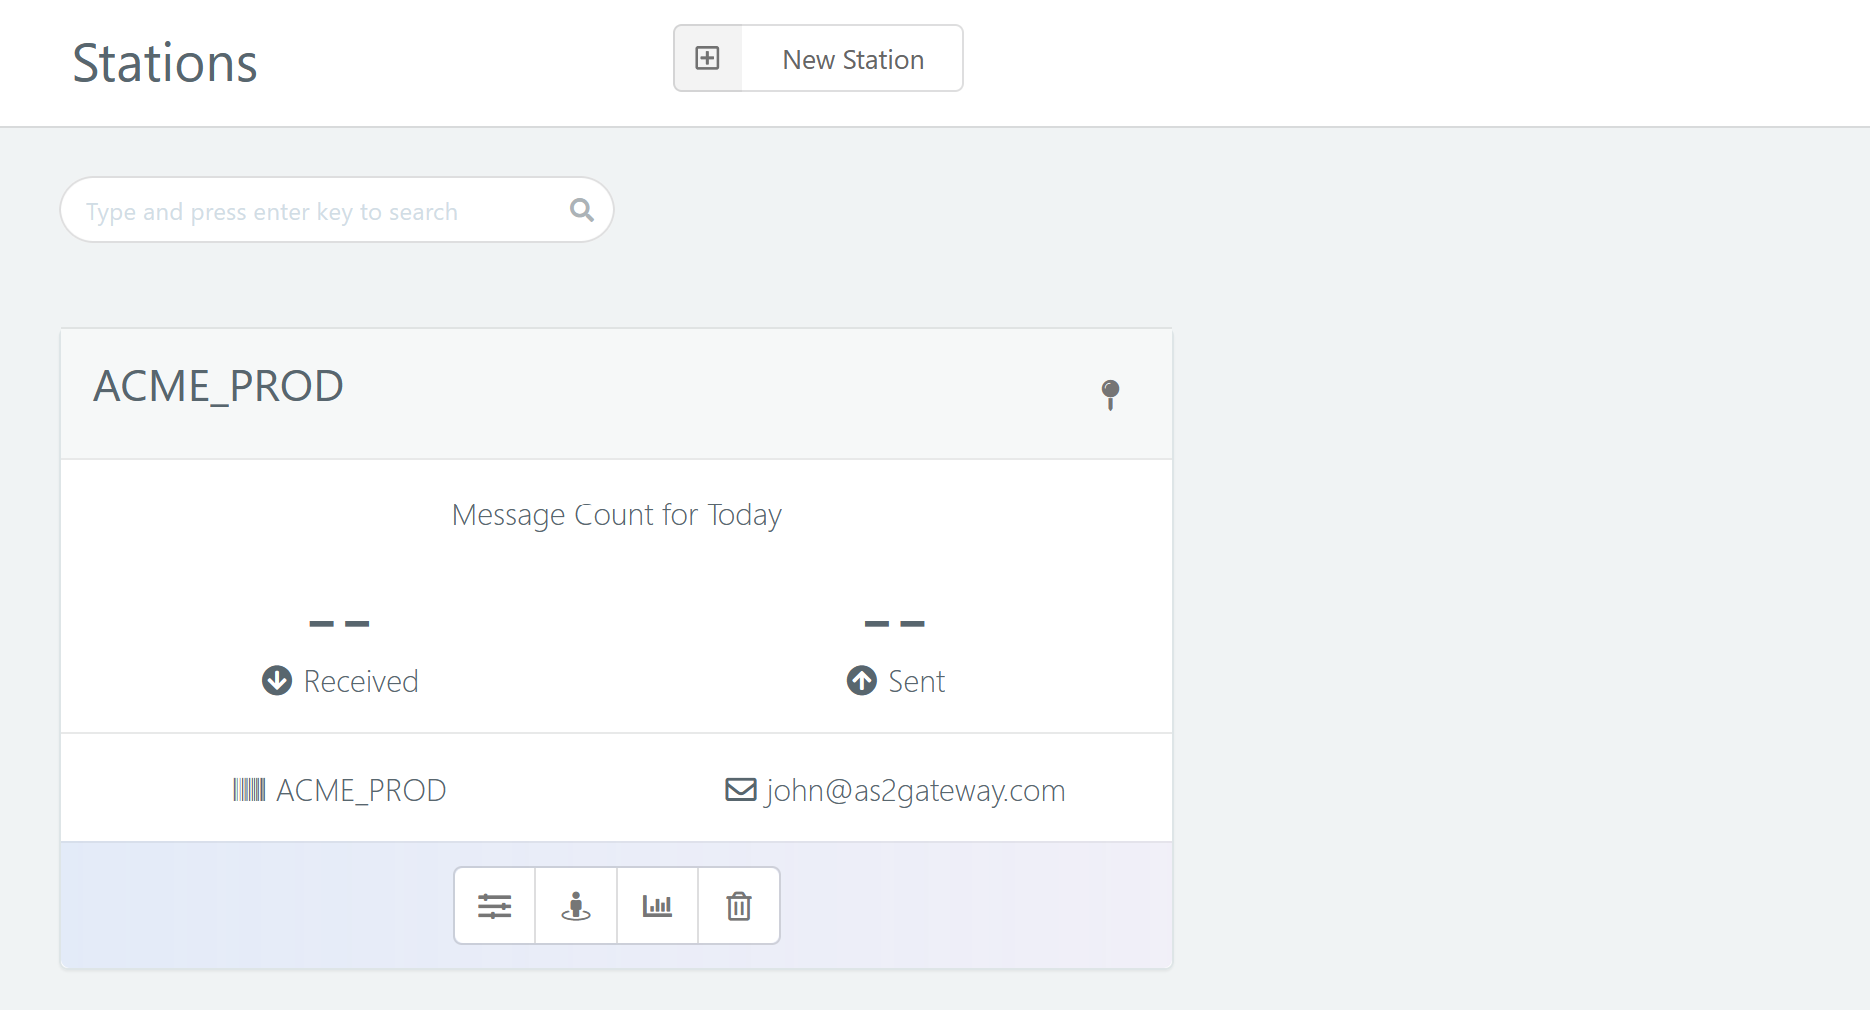
Once you add the station, you will be directed to the AS2 station listing page, from which you can view the Partner configuration of the station just created.

You can delete a station by clicking the delete icon in the top right corner of the station card. The actions icons at the bottom allows you to ‘Manage Station’, ‘View Partner Configuration’, and to ‘View Station Statistics’.
3.1 Partner Configuration of an AS2 Station
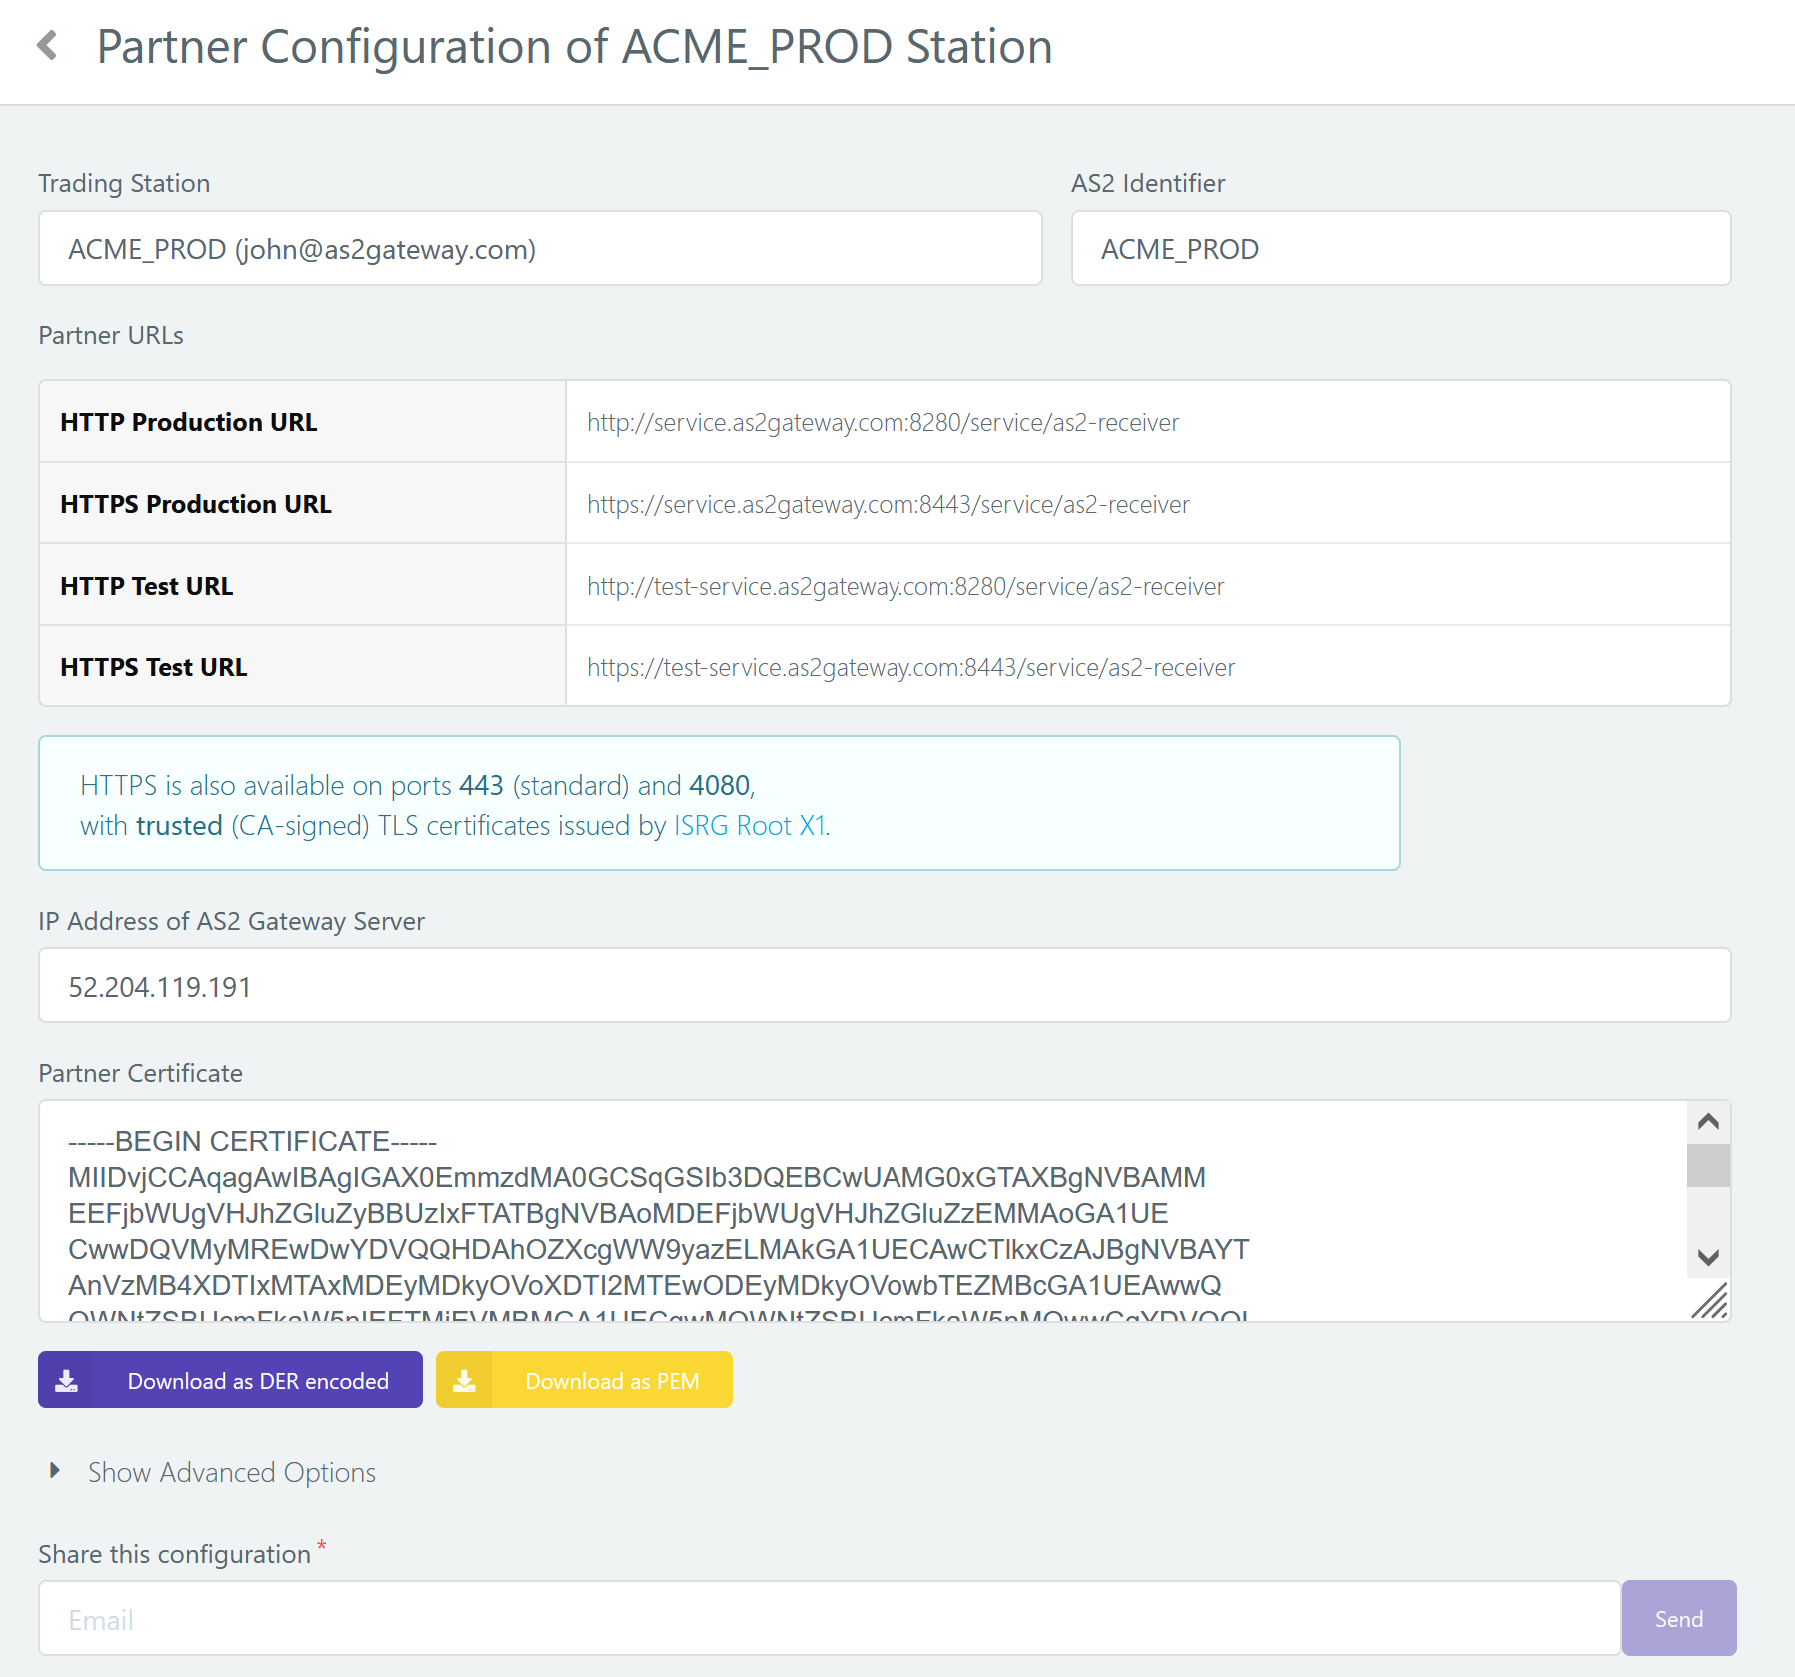
Click on the ‘View Partner Configuration’ button from the action panel of the trading station card. This shows you the configuration that you need to share with your partners.

You can use the Share this Configuration option to share this configuration with your partner via email. This will create an email with the AS2 ID of the station, the URL to be used, and the Certificates as a Zip file attachment, and any IP address etc, if applicable. Under the Show Advanced Options there is an optional selection to also include the HTTPS certificate.
Now that we have created a trading station, the next step would be to add a partner so that we can start communicating.


