EDI transformation service
EDI Generator can convert your flat EDI files into a more versatile, tree-like structure. With transforms, you can convert this tree structure into any other format that you prefer - such as XML, JSON, CSV, or even plain text.
Concept
After receiving an EDI file, EDIG converts and saves it as a hierarchical structure of loops and segments. Using a transform, you can convert this data structure to another format; removing/ignoring parts, combining fields, adding custom data elements, changing layout/ordering, and so forth. For example you can generate a CSV from the item details in a PO (850) EDI.
The transformation facility is available as a standalone service/API; it is not related to any incoming/outgoing documents. Even if you do not transact (receive, generate or send) EDI files through our platform, you can still use the transform API to convert EDI files into other formats using stateless HTTP/REST API calls.
Requirements
- Source EDI file(s) that you wish to convert
- An EDI definition that allows EDIG to interpret/parse above EDI type (depending on their X12 version and transaction type); if a definition is not available in our public partner directory, you can compose a definition on your own as well.
- An EDI transform (see below) for the actual conversion
- A set of API credentials (see below), if you wish to automate the conversion process
Transforms
Before you can start a conversion, you have to define a corresponding transform on your EDIG account. This is a schema or a set of rules, that can transform an input of a specific format into another specific format.
Types of transforms
EDIG currently supports XML stylesheets (XSLT) based transforms. While XSLT can be relatively complex to write, they can generate outputs of any format, including non/XML like JSON or CSV.
Writing a transform
This largely depends on the input/source EDI document that you intend to transform, and the rule format (XSLT, JSON-to-JSON, etc.). However the following basic points apply:
- Your transform will receive a document that is compatible with the chosen rule format; e.g. for XSLT, you will receive as input, an XML representation of the loop-segment hierarchy of the input document.
- Generated output can be of any valid textual format (XML, JSON, plain-text, CSV, …).
- Any errors raised by your transformation logic, will abort the process and return the same error as the response of the API invocation.
For example, in XSLT mode, you can use the following “identity” transform to obtain an exact copy of the originally mentioned tree structure, in XML format:
<xsl:stylesheet version="1.0"
 xmlns:xsl="http://www.w3.org/1999/XSL/Transform">
  <xsl:output omit-xml-declaration="yes" indent="yes"/>
  <xsl:strip-space elements="*"/>

  <xsl:template match="node()|@*">
    <xsl:copy>
      <xsl:apply-templates select="node()|@*"/>
    </xsl:copy>
  </xsl:template>
</xsl:stylesheet>
Testing a transform
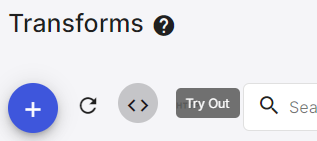
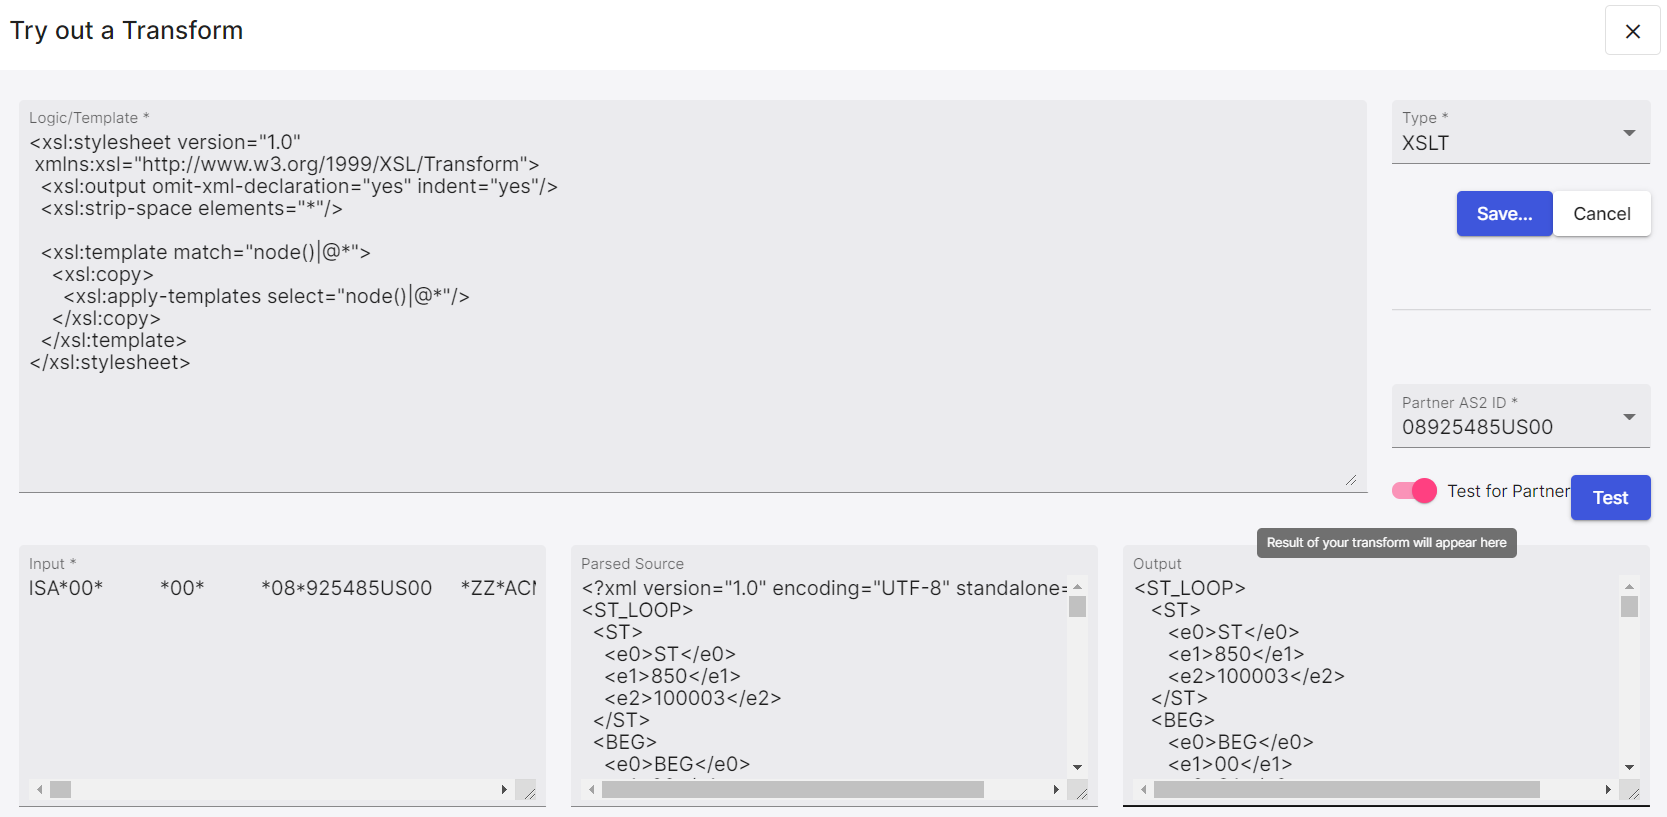
The Transforms page of EDIG has a Try Out button, which allows you to interactively develop and test a transform rule-set.

- Under Type, select the type/format of the transform.
- Under Logic/Template, enter the definition/rule-set (content) of the transform; e.g. the XSLT stylesheet.
- Under Input, enter the input EDI content that you wish to convert during testing.
- To identify the EDI definition to use to interpret the EDI file, select one of the following:
- If the EDI file belongs to (e.g. sent by) one of your existing partners,
- Turn on the Test for Partner option.
- Select the partner from the Partner AS2 ID drop-down.
- If you have only added an EDI definition matching this EDI format (i.e. it does not belong to an existing partner),
- Turn off the Test for Partner option.
- Select the matching EDI definition from the EDI Definition Name drop-down.
- If the EDI file belongs to (e.g. sent by) one of your existing partners,
- Click Test.

During testing, EDIG will:
- parse your EDI definition using the chosen partner,
- convert the resulting structure into a format compatible with your transform’s expected input type (e.g. XML in case of XSLT),
- apply the transform, and
- display:
- the formatted input (from step 2) on the Parsed Source section
- the transformed result (from step 3) on the Output section
If any step fails, instead of the output, you will receive a pop-up indicating the error. You can immediately modify the EDI input and/or the logic to fix the issue, and re-run the test to verify it.
Once you are satisfied with the transformation output, you can directly proceed to save the transform by clicking Save.
Saving a transform
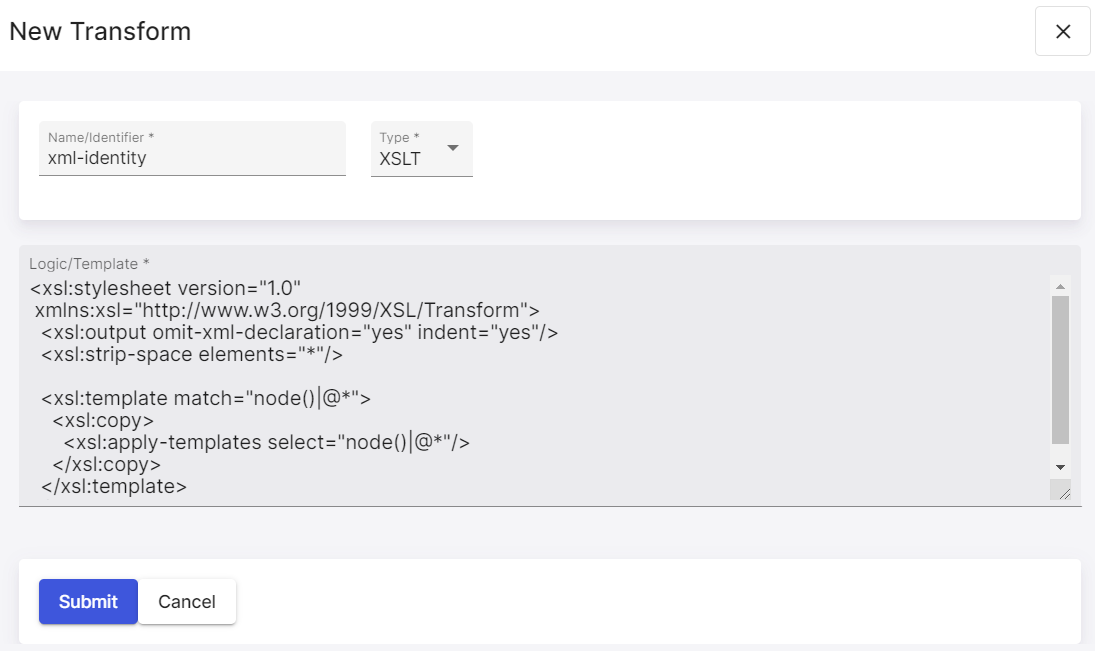
You should save each developed transform with a unique name, so that it can be later used to perform conversions; either through the REST API, or from the web UI itself.

- Under Name/Identifier, enter a unique name to identify your transform. We recommend using a name that can be easily used as a HTTP query parameter (without spaces or special characters), when invoking the API.
- Under Type, select the type/format of the transform. If you came from the Try Out dialog, this would be auto-populated for you.
- Under Logic/Template, enter the conversion logic or “content” of the transform. If you came from the Try Out dialog, this would be auto-populated for you.
- Click Submit.
You can test/try-out, modify and re-save a created transform any time, using the corresponding action buttons on the transform list/table.
Transformation REST API
After you have developed and saved a transform, you can directly submit EDI files to the REST API, to convert them using that transform.
Transform Request
API endpoint: https://us-central1-edigateway-prod.cloudfunctions.net/convert
Authentication: use the access token (see below) as an Authorization: Bearer {token value} request header
Request headers:
Authorization: bearing the API access token as aboveContent-Type: format of the source EDI file, usuallyapplication/x12
Request query parameters:
transformName: name of the transform, from the saving step above- One of the following:
ediDefinitionName: name of the EDI definition to use, to parse the input documentpartnerAS2ID: AS2 identifier of the partner that the EDI belongs to; EDIG will try to automatically find the correct EDI definition
Request body: content of the raw EDI file (e.g. for X12, beginning with ISA.. and ending with ..IEA..)
A sample request using curl would look like:
curl -X POST "https://us-central1-edigateway-prod.cloudfunctions.net/convert?transformName={transform to use}&ediDefinitionName={definition matching EDI file}" \
  -H "Content-Type: application/x12" \
  -H "Authorization: Bearer {access token}" \
  --data-binary "{EDI*file*content~}"
Transform response
Response code:
- 200 (OK): successfully transformed
- 400 (Bad Request): something is wrong with the provided input or parameters
- 500 (Server Error): an unexpected error occurred when transforming; the response body may contain details, if not please contact the support team for assistance
Response headers:
Content-Type:- on success: format of the transformed output; e.g.
application/xmlfor XSLT - on failure:
text/plain
- on success: format of the transformed output; e.g.
Response body:
- on success: transformed output
- on failure: details of encountered error, as a text string
API credentials
The transform API uses bearer-token authentication. You can obtain tokens from the Get API Tokens button of the transforms list page.

The API token generation pop-up will provide sample requests for the API calls, as well as the renewal of the API access token upon expiry.
Access token
This is the only credential to be used directly with the API. It will be issued for the currently logged-in EDIG user’s identity.
The token should be included as an Authorization request header, with a Bearer prefix:
Authorization: Bearer {value of the token string}
The token is short-lived (usually with 1-hour validity time) and should be renewed periodically using the refresh token. You can find the expiration timestamp (in seconds) of an existing token by JWT-decoding it, e.g. via Javascript:
JSON.parse(atob(token.split('.')[1])).exp
Refresh token
Do not pass this to actual API calls; instead, use it only to obtain a new access token when the current token has expired.
You can obtain a new token using a request similar to the following:
curl -X POST "https://us-central1-edigateway-prod.cloudfunctions.net/refreshToken" \
  -H "Content-Type: text/plain" \
  --data-binary "{refresh token value}"
The response will be JSON, of format (possibly including more fields):
{
  "access_token": "herebe.accesstoken.whichisalongJWTstring",
  "expires_in": "3600"
}
where access_token is the new token and expires_in is its validity duration (seconds, from the issuing time).


