MFT Gateway is a hosted Software as a Service (SaaS) solution that enables file exchange over the AS2 or SFTP protocol, without the need to install or maintain.
- Blog
- A Guide to integrating MFT Gateway and EDI Generator
EDI | Walmart
A Guide to integrating MFT Gateway and EDI Generator
This article offers a complete guide to integrating MFT Gateway and EDI Generator to streamline your organization's operations.

Thanura Jayatissa
Published: 03 Jul 2024

AS2 (Applicability Statement 2) and EDI (Electronic Data Interchange) are vital components in facilitating efficient business operations.
AS2 is a standardized protocol used for secure and reliable B2B data transfer over the Internet. Meanwhile, EDI is a standardized method for the electronic exchange of business documents such as purchase orders, invoices, and shipment notices.
By using AS2 for EDI communication, businesses can ensure their data exchanges are both secure and efficient.
AS2 guarantees both the secure and reliable data transfer keeping in mind payload encryption and certificate-based authentication
as opposed to other protocols such as FTP which transmit credentials in plain text and no transit encryption.
AS2 protocol also offers data integrity and non-repudiation through digital signatures without requiring additional protocol layers.
In addition, AS2 offers electronic receipts (MDNs) that confirm delivery of the message and assure against content duplication-features that native FTP does not inherently provide.
The MFT Gateway provides AS2 services, while the EDI Generator allows you to view and create EDI files. By integrating these two software solutions, you can automate AS2 and EDI processes at no additional charge for AS2 and pay-as-you-go options for EDI. Prices are openly published, allowing you to select the best plan for your needs. So, in this article let’s talk about how to set up MFT Gateway and EDI Generator to optimize your operations and achieve successful B2B EDI file transfer.
Setting up EDI Generator Integration on MFT Gateway
Firstly, you will need to create at least one station that defines an identity for your organization to communicate over the AS2 protocol. You will also need to create separate partners that specify the AS2 details of your trading partners, with whom your organization will be exchanging EDIs using AS2. After that, you will have to set up EDI Generator integration on your MFT Gateway account. Navigate to EDI Generator by clicking the Integrations menu icon on the left navigation pane.
If you have not already enabled AWS S3 integration, the below page will appear and ask you to enable S3 integration first since AWS S3 is used to exchange AS2 messages between the MFT Gateway and the EDI Generator.
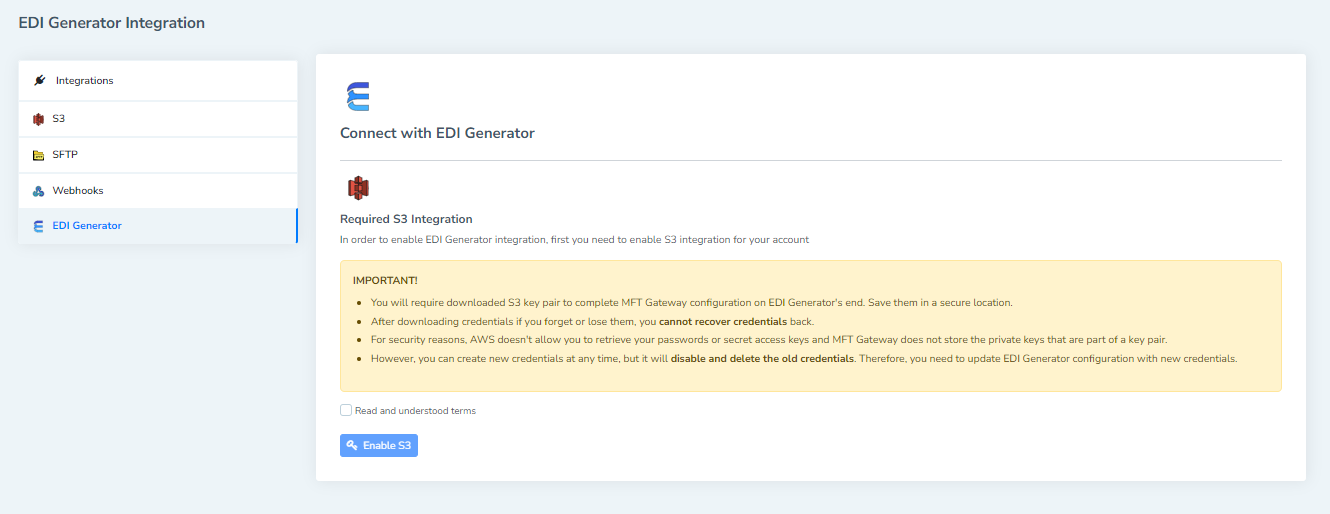
A pair of S3 access credentials will be generated and made available for download when you enable S3 integration. Please make sure to save these credentials, as they will be needed to configure the integration on the EDI Generator side.
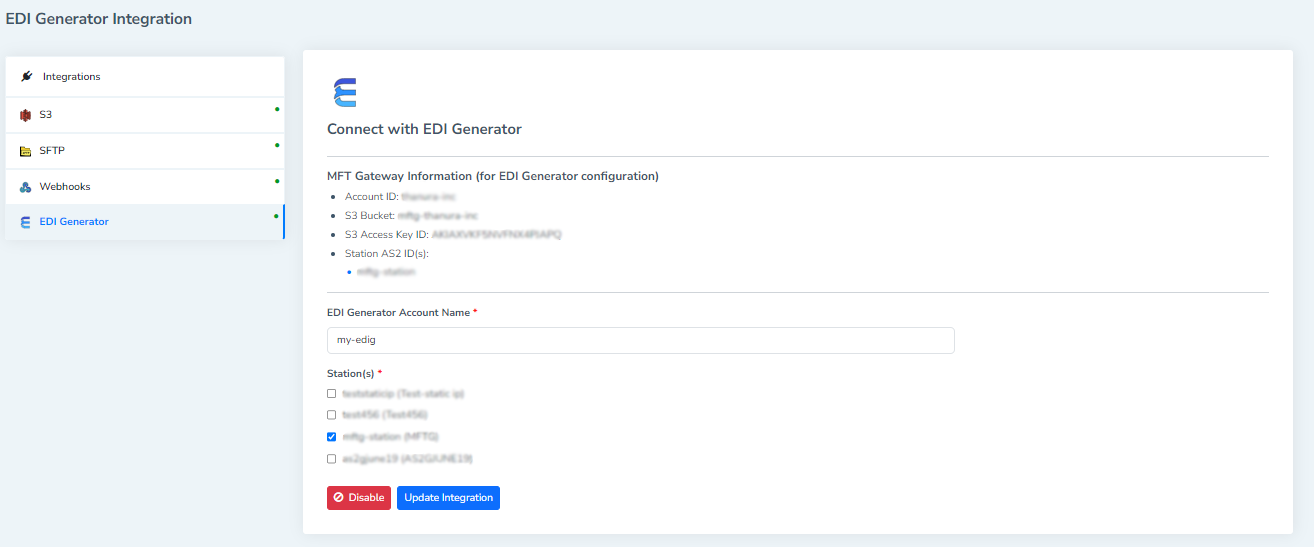
After enabling S3 integration, you will see the EDI Generator integration view.

Provide the EDI Generator Account Name, which is your unique account identifier in the EDI Generator account. This account name will be shown in the EDI Generator account under the MFT Gateway integration section. You can select one or more AS2 stations you created to be integrated with the EDI Generator. Only the messages received for these selected stations will be processed by the EDI Generator.
Even if a particular station is selected under the EDI Generator integration, only the received files identified as “EDI files” will be processed by the EDI Generator by default. For a file to be recognized as an “EDI file”, it should meet any of the following conditions:
- The content type of the file is application/x12 or application/edi.
- The file extension is .x12, .edi, or .edifact.
Click Integrate to complete the integration. You will then be shown the necessary information under MFT Gateway Information (for EDI Generator configuration) required to complete the setup on the EDI Generator side. Additionally, you will need the AWS Secret Access Key downloaded previously when you enabled S3 integration.
Click Integrate to complete the integration. You will then be shown the necessary information under MFT Gateway Information (for EDI Generator configuration) required to complete the setup on the EDI Generator side. Additionally, you will need the AWS Secret Access Key downloaded previously when you enabled S3 integration.
Setting up the Integration on EDI Generator
In the EDI Generator account, navigate to “Organization” under the “Administration” menu from the left navigation pane. Then proceed to the “MFT Gateway Integration” section to set up the integration with your MFT Gateway account. You will then see the section shown below.

For the fields MFT Gateway S3 Bucket, MFT Gateway S3 Access Key, and MFT Gateway S3 Secret Key, enter the details obtained from the MFT Gateway. In the AS2 IDs section, create an entry for each station chosen for integration on the MFT Gateway side. Enter the AS2 identifier of the station in the “AS2 ID” field and provide a user-friendly name in the “Alias” field to indicate the purpose of this AS2 ID (e.g., Production or Test). If you are integrating multiple stations, choose a “Default AS2 ID” to be used when no specific AS2 ID is selected for an operation (e.g., sending an EDI to a partner). After completing the MFT Gateway Integration parameters, click the “Verify Integration” button at the top right corner to validate the settings with those configured on the MFT Gateway account.
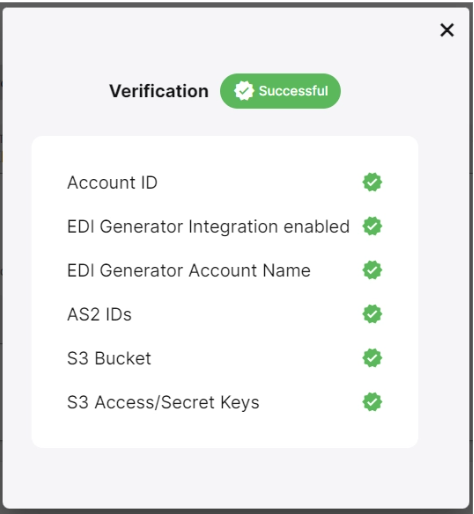
If everything is correct, a confirmation popup will appear such as below indicating that the verification is successful. If there are errors, correct them and re-try the verification.
Conclusion
In conclusion, leveraging MFT Gateway and EDI Generator can significantly enhance an organization’s productivity, reduce costs and it will also reduce the risk of manual errors when creating and transferring EDIs. The use of MFT Gateway’s AS2 service and the EDI Generator’s capabilities offers a seamless solution for organizations seeking to streamline their B2B EDI exchange operations. With transparent pricing and the flexibility to select the best plan, businesses can effectively manage their data exchange needs.
Explore our AS2 and EDI solutions, feel free to contact us at support@aayutechnologies.com!

Talk to an EDI Expert
Join hundreds of organizations already taking full control of their B2B AS2 communications with our trusted solutions. Contact us today to tailor a solution that fits your specific AS2 EDI needs.
Related Articles
View All BlogsExplore our product stack
Try before you buy with a 30-day Free Trial
No commitment, all value. Try the AS2 Solution Risk-Free and discover how our solutions can transform your business workflows. No credit card required.
Explore Your Possibilities
Elevate AS2 Communications with our EDI and AS2 Solutions
See how our AS2 and EDI solutions can simplify your integrations, boost efficiency, and keep you compliant—request a personalized demo today.
