MFT Gateway is a hosted Software as a Service (SaaS) solution that enables file exchange over the AS2 or SFTP protocol, without the need to install or maintain.
- Blog
- Steps to Establish an AS2 EDI Connection
AS2 | EDI
Steps to Establish an AS2 EDI Connection
Learn how to establish a secure AS2 EDI connection with this step-by-step guide. Read our blog to discover how to set up an AS2 and EDI connection using MFT Gateway and EDI Generator.

Hirudinee Liyanage
Published: 07 Aug 2024

Aayu Technologies currently offers three main products: MFT Gateway, AS2 Gateway, and EDI Generator. Each product is designed to cater to specific business needs:
- MFT Gateway and AS2 Gateway: These platforms allow customers to share business documents with their partners using secure protocols like AS2 or SFTP.
- EDI Generator: This product offers a rich user interface for viewing EDI documents and generating EDI responses.
Which AS2 EDI Solution is Most Suitable for My Requirements?
I Don’t Use EDI and only Need to Transfer Files Over AS2 or SFTP
If your organization does not use EDI files and only needs a medium to transfer business documents over AS2 or SFTP protocols, you only need an account with either MFT Gateway (which supports AS2 and SFTP) or AS2 Gateway (supports only AS2). Your choice should depend on factors such as file sizes, transaction frequency, preference for cloud-based or server solutions, and your budget.
Important: You do not need accounts in both products. Select the one that best suits your requirements and proceed with it.
I Already Have a System to Interpret and Generate EDI Documents, Only Need to Transfer Them Over AS2 or SFTP
In this case, you will only need either an MFT Gateway or AS2 Gateway account. Both gateways offer multiple integrations, such as S3, SFTP, Webhook, or API, allowing you to automate the file transfer process and integrate it with your current system.
I Need Both EDI Generation and AS2 File Transfer Capabilities
In this scenario, you will need an EDI Generator account along with either an MFT Gateway or AS2 Gateway account. This setup allows the EDI files received by the MFT Gateway or AS2 Gateway to be interpreted, and response EDI files to be generated and sent out.
If you require both AS2 and EDI capabilities, follow the steps described in the article to integrate the two Aayu products so that the MFT gateway can receive and send files over AS2, while EDI Generator interprets and generates EDI files for you.
How do I set up an AS2 EDI connection?
Step 1: Create an Aayu Account
1.1 I’m Completely New and Do Not Have an Aayu Account Navigate to the Create Account page of Aayu and follow the steps to create an account. Make sure to check the “I need EDI processing over AS2” box in the first step. This will create both MFT Gateway and EDI Generator accounts. You can use the same login credentials for all accounts.
1.2 I Already Have an MFT Gateway Account If you already have an MFT Gateway account, navigate to the EDI Generator login page, enter your MFT Gateway credentials, and click on the login button. If you do not have an EDI Generator account, one will be created at that time.
Step 2: Establish an AS2 Connection
Once your MFT Gateway and EDI Generator accounts are created, you need to establish the AS2 connection with your partner. Please refer to our blog on setting up an AS2 connection. If you are just starting and do not have partner details yet, you can use our Mock Station/ Partner to proceed with the setup.
Step 4: Enable EDI Integration on MFT Gateway
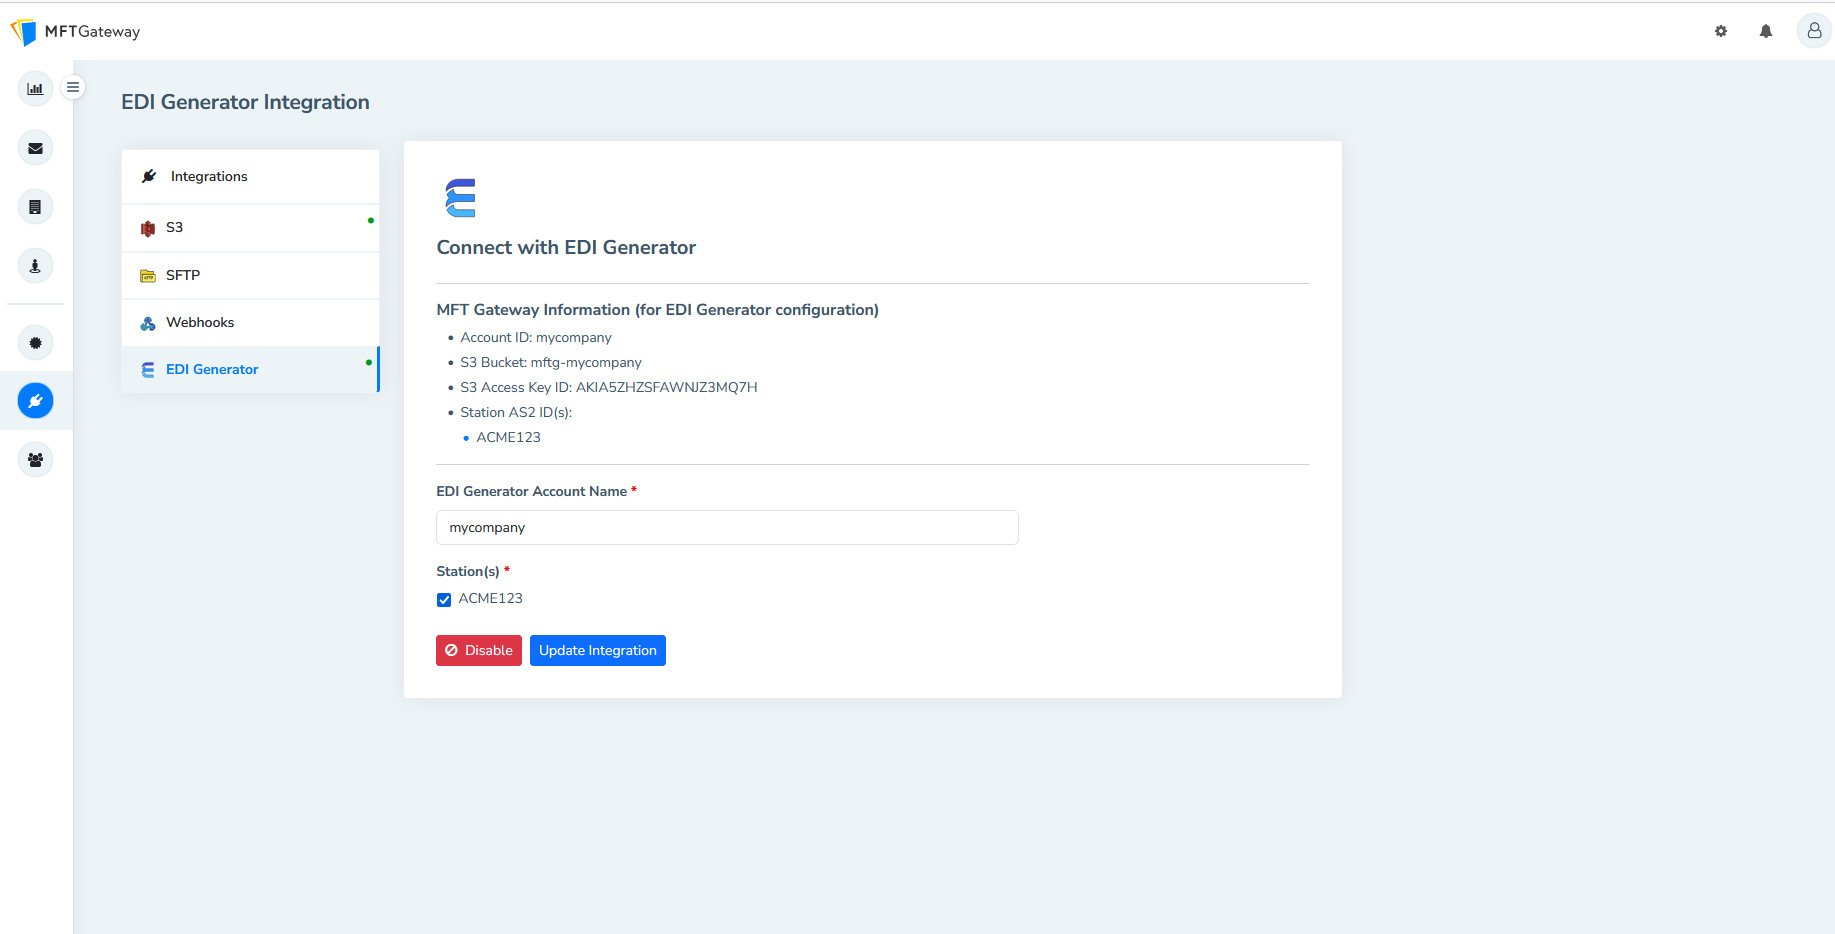
Once AS2 Station and Partner are configured on MFT Gateway, navigate to Integrations → EDI Generator.

The EDI Generator account name should match the Account ID of your MFT Gateway account. Select your station(s) and click on the Integrate button. Upon successful integration, details will be displayed on the EDI Generator Integration page for use in later steps.
Step 5: Integration on the EDI Generator Side
Log in to your EDI Generator account and navigate to Administration → Organization. On this page, enter the details under MFT Gateway Integration:

MFT Gateway S3 Bucket: S3 Bucket name from the integration details(3.2 image). MFT Gateway S3 Access Key: S3 Access Key ID from the integration details(3.2 image). MFT Gateway S3 Secret Key: Secret access key from the AccessKeys.csv file.
Ensure that the EDI Generator Account Name under MFT Gateway Integration matches the name given in Step 2. If they differ, update the name on the MFT Gateway side.
Step 6: Verification
Fill in all the details under MFT Gateway Integration and click the Verify Integration icon. A successful verification popup should appear if everything is correctly configured.
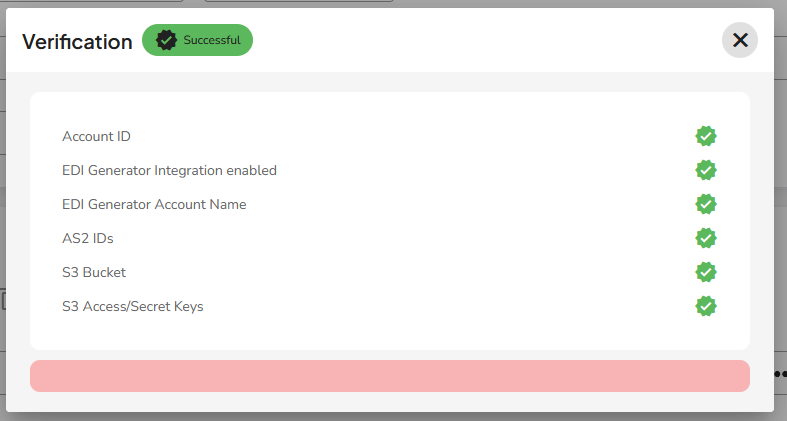
If verification fails, double-check the red colored fields on the verification pop-up. The following popup indicates issues of AS2 IDs, S3 bucket, and S3 Access/Secret Keys.
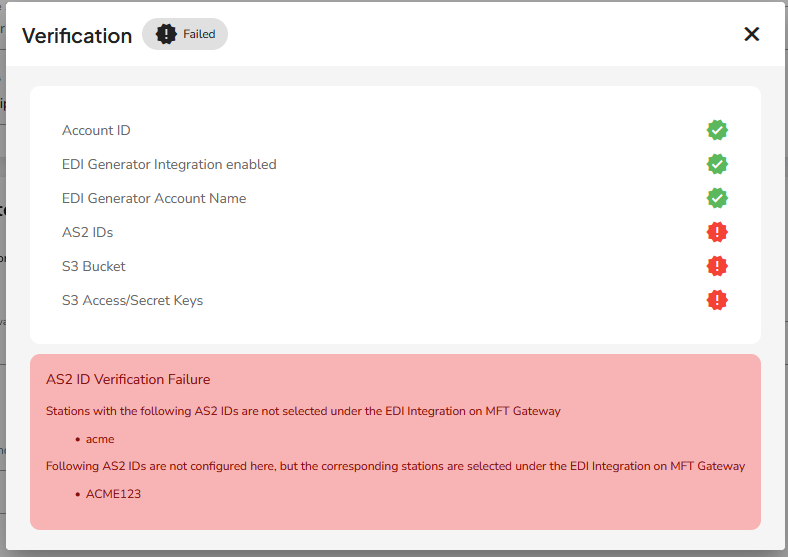
Step 7: Complete Other Mandatory Organization Details
After successfully verifying the MFT Gateway Integration, complete the Address Line 1 and ISA and GS Identification details. If you are unsure about the ISA ID Qualifier, keep the default ZZ and use an ID that represents your company for the ISA Identifier and GS Code. You can use the same value for both fields.
Once these steps are completed, EDI files received by MFT Gateway via AS2 protocol will be added to the EDI Generator’s inbox. Follow our series of blogs to learn more about how to view and generate EDI files.

Talk to an EDI Expert
Join hundreds of organizations already taking full control of their B2B AS2 communications with our trusted solutions. Contact us today to tailor a solution that fits your specific AS2 EDI needs.
Related Articles
View All BlogsExplore our product stack
Try before you buy with a 30-day Free Trial
No commitment, all value. Try the AS2 Solution Risk-Free and discover how our solutions can transform your business workflows. No credit card required.
Explore Your Possibilities
Elevate AS2 Communications with our EDI and AS2 Solutions
See how our AS2 and EDI solutions can simplify your integrations, boost efficiency, and keep you compliant—request a personalized demo today.


