If your company is onboarding with Walmart as one of their logistics partners, you must be
EDI compliant with Walmart’s Retail Link system. This EDI compliance
process usually involves three phases that need to be completed before Walmart sends you actual (production) load tenders.
Before completing these phases, you must have a software capable of processing Walmart logistics-related EDIs and the
capability to exchange them with Walmart using the AS2 protocol.
The steps mentioned in this article are based on EDI Generator,
which is a cloud-based hosted EDI solution with flexible pay-as-you-go pricing.
The first phase is to create AS2 connectivity with Walmart, which is the transmission protocol they will be using to
exchange EDIs with your company. Please refer to this article for a step-by-step
guide on how it can be done with Aayu MFT Gateway.
The second phase is to configure EDI connections with Walmart and complete the basic level testing via RetailLink.
Please refer to this article for a step-by-step
guide on how it can be done with Aayu EDI Generator.
(Although that article mainly focuses on configuring retail-related EDI types such as purchase orders and invoices,
the general configuration and testing process is the same for logistics-related EDI types, such as load tenders,
load tender responses, and shipment status updates.)
The third phase is the final testing phase, where the Walmart team will send “test” EDIs to you through the actual
AS2 channel to simulate a real scenario. You are then expected to respond with specific types of EDIs, providing the
expected information and in the correct order. Passing this testing phase is a mandatory requirement, before you can
receive actual load tenders from Walmart.
In this article, we will discuss the steps you need to follow to successfully pass this final testing phase.
Passing this final testing phase can be challenging due to several reasons.
In contrast to the basic EDI testing done with Retail Link in phase 2, this phase requires the Walmart team
themselves to initiate “test” load tenders to your account. To facilitate this, you will need to contact them to
coordinate a suitable date and time according to their availability.
Once you receive the “test” load tenders, you are expected to complete the testing process generally within a 2-hour
window.
In case of test failure, you typically will not receive specific reasons for the failure. Instead, you will need to
consult their guides, identify any potential issues in your EDIs, and then reschedule the test by arranging another
test load tender with the Walmart team.
Testing Process Overview
Walmart will generally send 2 test load tender (204) EDIs.
One of them should be responded to with an “Accepted” load tender response (990), and the other should be responded to
with a “Rejected” load tender response (990).
Subsequently, the “accepted” load tender should be further responded to with 6 shipment status updates (214) in a
specific order, simulating an actual delivery life cycle.
A test load tender (204) from Walmart will be similar to the following.
ST*204*100006~
B2**ABCD**63277800**CC~
B2A*00*LT~
L11*31*ACB~
G62*64*20231005*1*143305*CT~
NTE**This is an EDI Test load DO NOT CNCL or book carrier EDI-GEM will delete once co~
NTE**mpleted~
N1*OB*Wal-Mart Stores Inc*UL*0078742000008~
N7**0*********TF****5300~
S5*1*CL~
L11*99999900*P8~
G62*10*20231005~
AT5**PL~
N1*SF*COMSTOCK - NOT VALID*93*99999900~
N3*COMSTOCK DRIVE~
N4*COMSTOCK*MI*49041~
G61*IC*JOHN DICK*TE*9999999999~
S5*2*CU~
G62*54*20231005~
AT8*G*L*36000*1000**E*1100~
N1*ST*DC 6043*UL*0078742031446~
N3*500 JONESVILLE RD~
N4*COLDWATER*MI*49036~
L3*36000*G*******1100*E*1000~
SE*25*100006~
Generating Load Tender Responses
As mentioned earlier, Walmart will typically send two test load tender (204) EDIs: one for acceptance and the other for
rejection. They will inform you separately, usually via email, which one is to be accepted and which one is to be
rejected.
Sending “Accepted” Load Tender Response
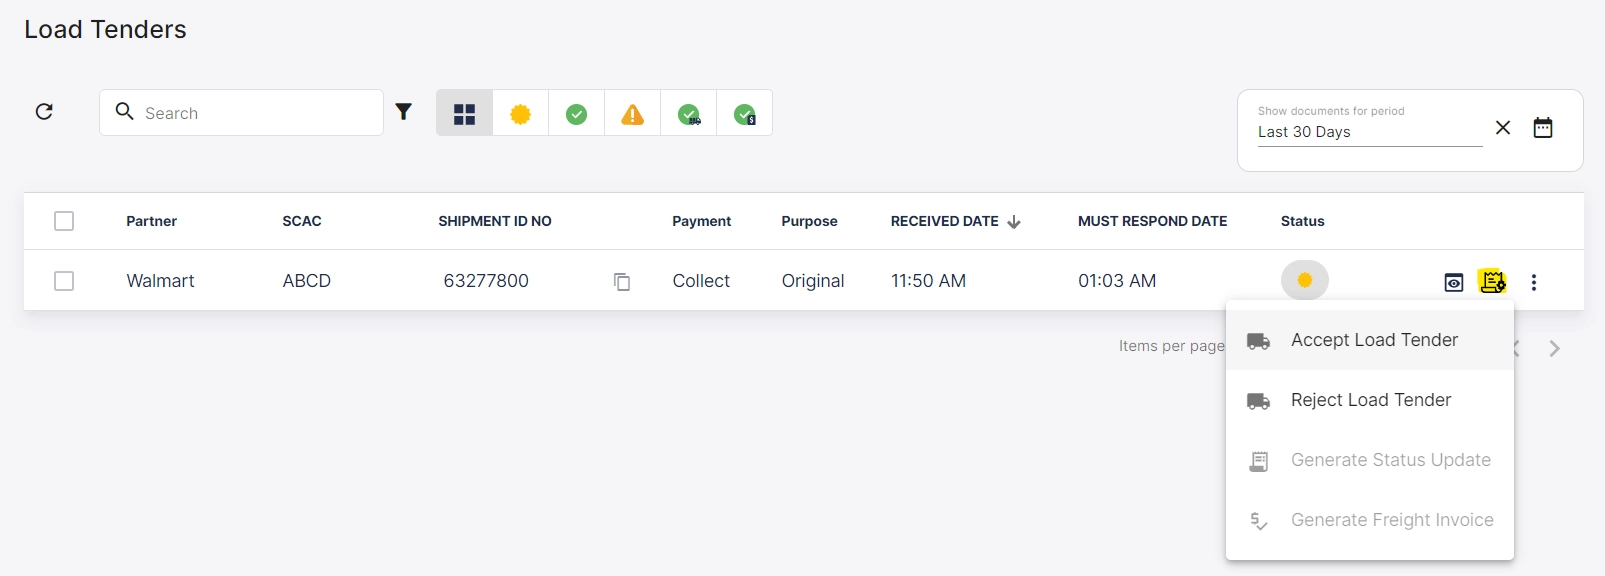
Navigate to the Load Tenders list on your EDI Generator account and
locate the relevant load tender to be accepted from the list.
Click on the Generate button and then select the Accept Load Tender option from the menu.
Generating an 'Accepted' response
This will open the edit view of a load tender response. All the required fields should have been automatically
populated, hence there is no need to change or add anything else. Create the LT response, generate the EDI and send.
Generated/sent Load tender response (990) will be similar to the following.
Navigate to the Load Tenders list on your EDI Generator account and
locate the relevant load tender to be rejected from the list.
Click on the Generate button and then select the Reject Load Tender option from the menu.
Generating a 'Rejected' response
This will open the edit view of a load tender response. All the required fields should have been automatically
populated, hence there is no need to change or add anything else. Create the LT response, generate the EDI and send.
Generated/sent Load tender response (990) will be similar to the following.
For the accepted Load Tender, Walmart expects the partner to send the following 6 shipment statuses in order.
Pickup Appointment (AA)
Arrived at Pickup Location (X3)
Departed Pickup Location (AF)
En Route to Delivery Location (X6)
Arrived at Delivery Location (X1)
Completed Unloading (D1)
AA (Pickup Appointment) Status
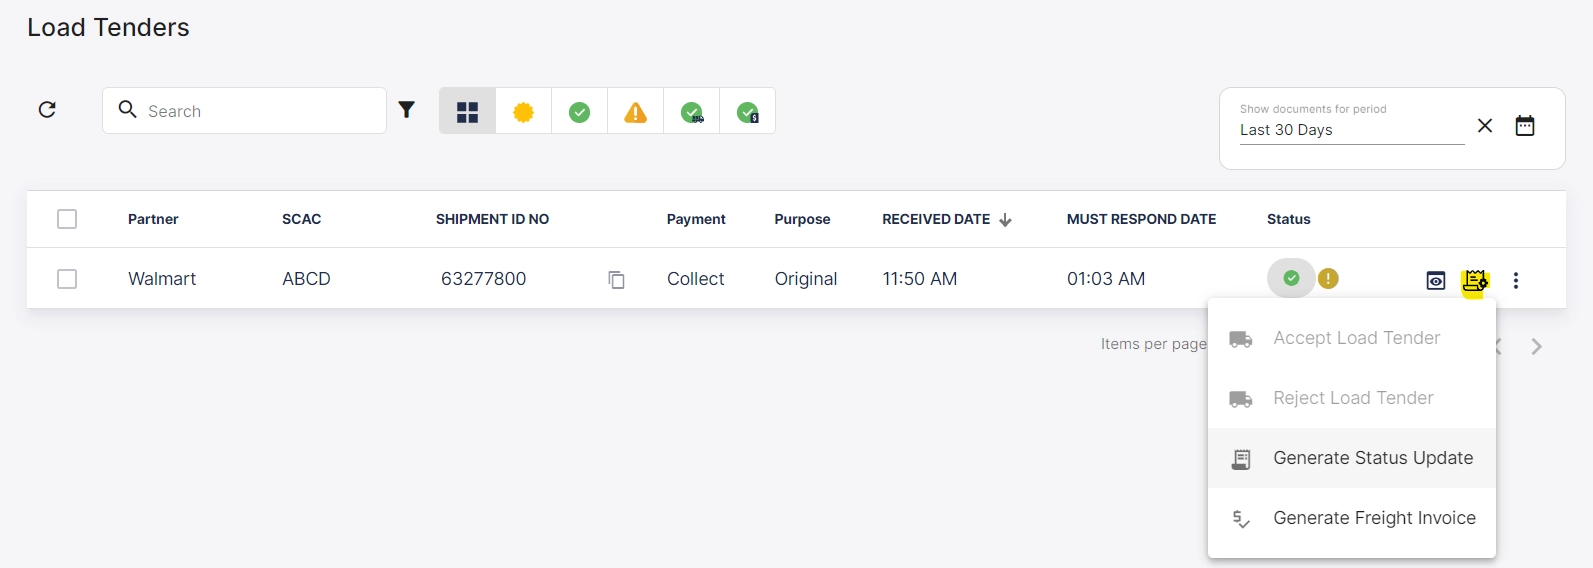
Navigate to the Load Tenders list in your EDI Generator account and
locate the relevant load tender from the list.
Click on the Generate button and then select the Generate Status Update option from the menu. This will open
the edit view of a shipment status.
Generating a shipment status update
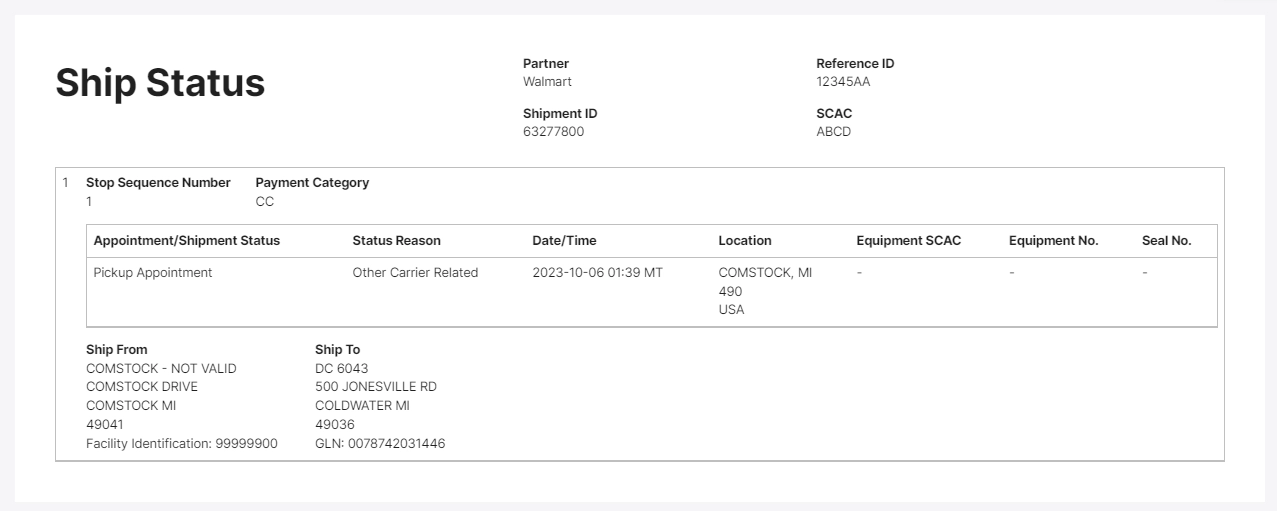
For the Reference ID field, you can provide any random reference number you like, but it should be unique for
each shipment status as per the Walmart specification. For example, you can use a value such as 12345AA as this is
“AA” type status.
Under the References section, first select Type as Stop Sequence Number (QN) and specify 1 for the
Identification field.
Then add another reference using the Add Reference button, select Type as Stop Payment Category (9V) and
specify CC for the Identification field.
Proceed to the Status Details section.
Select Pickup Appointment (AA) as the Appointment Status Code.
Select Status or Appointment Reason as Other Carrier Related (AJ).
Specify City, State and Postcode with the Ship From details from the load tender you received. You can
simply copy them from the already populated Ship From (SF) line under the Parties section below in this same
shipment status. Specify Country as USA.
No need to fill Equipment SCAC, Equipment No. or Seal No. fields.
Proceed to the Parties section.
Select ID Qualifier as Facility Identification (FA) on the Ship From (SF) line.
Then create the ship status, generate the EDI and send.
AA (Pickup Appointment) Status
X3 (Arrived at Pickup Location) Status
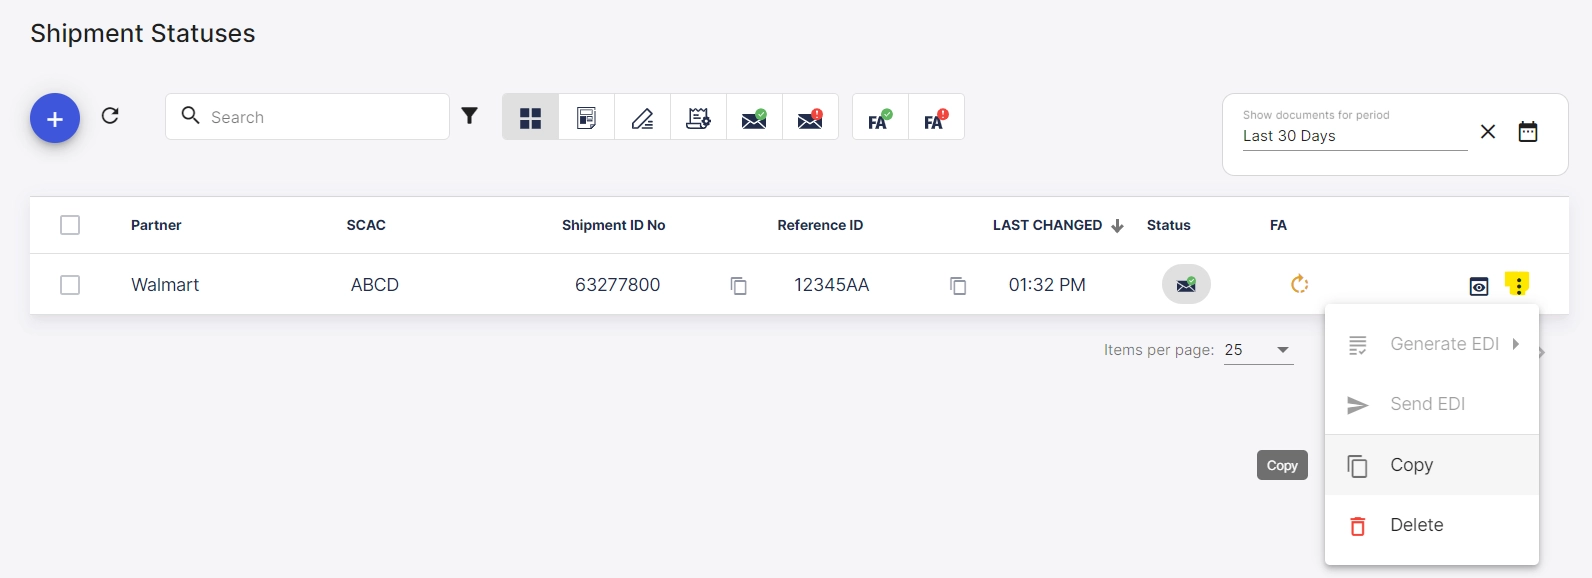
Navigate to the Shipment Statuses list in your EDI Generator
account and locate previously sent AA type shipment status.
Click on the More button and then select the Copy option to create a new copy of the previous shipment status.
Making a copy of a shipment status update
Change the Reference ID field to a different value such as 12345X3.
Proceed to the Status Details section.
Select Arrived at Pickup Location (X3) as the Appointment Status Code.
Keep Status or Appointment Reason as Other Carrier Related (AJ).
Change the Location Type as Longitude and Latitude.
Enter 084° 59′ 02″ as the Longitude and select Direction as West. Then enter 041° 59′ 19″ as the Latitude
and select Direction as North.
(Since this is just a test, you can use the same location coordinates mentioned above in your testing, irrespective of
your location.)
Fill Equipment SCAC and Equipment No. fields.
Then create the ship status, generate the EDI and send.
X3 (Arrived at Pickup Location) Status
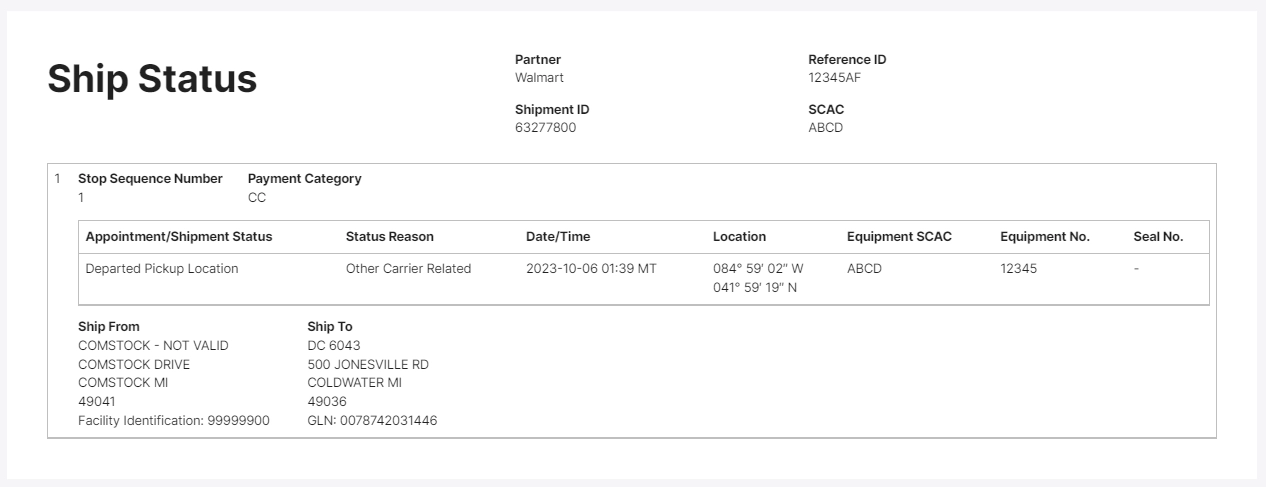
AF (Departed Pickup Location) Status
Navigate to the Shipment Statuses list and get a copy of the previously sent X3 type shipment status.
Change the Reference ID field to a different value such as 12345AF.
Proceed to the Status Details section.
Select Departed Pickup Location (AF) as the Appointment Status Code.
Keep all other fields the same.
Then create the ship status, generate the EDI and send.
AF (Departed Pickup Location) Status
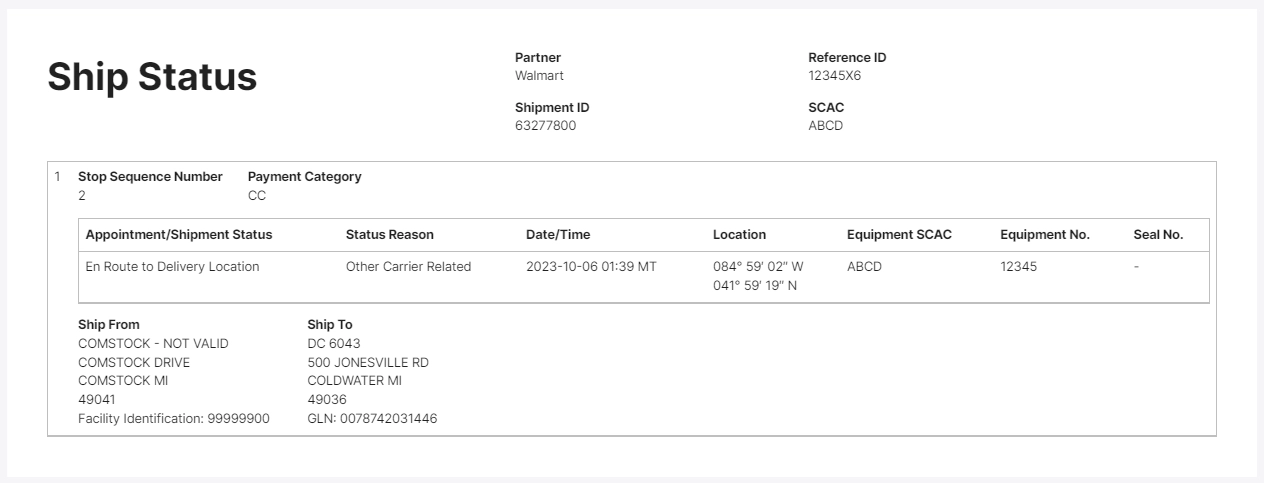
X6 (En Route to Delivery Location) Status
Navigate to the Shipment Statuses list and get a copy of the previously sent AF type shipment status.
Change the Reference ID field to a different value such as 12345X6.
Under the References, change the value of Stop Sequence Number (QN) as 2.
Proceed to the Status Details section.
Select En Route to Delivery Location (X6) as the Appointment Status Code.
Keep all other fields the same.
Then create the ship status, generate the EDI and send.
X6 (En Route to Delivery Location) Status
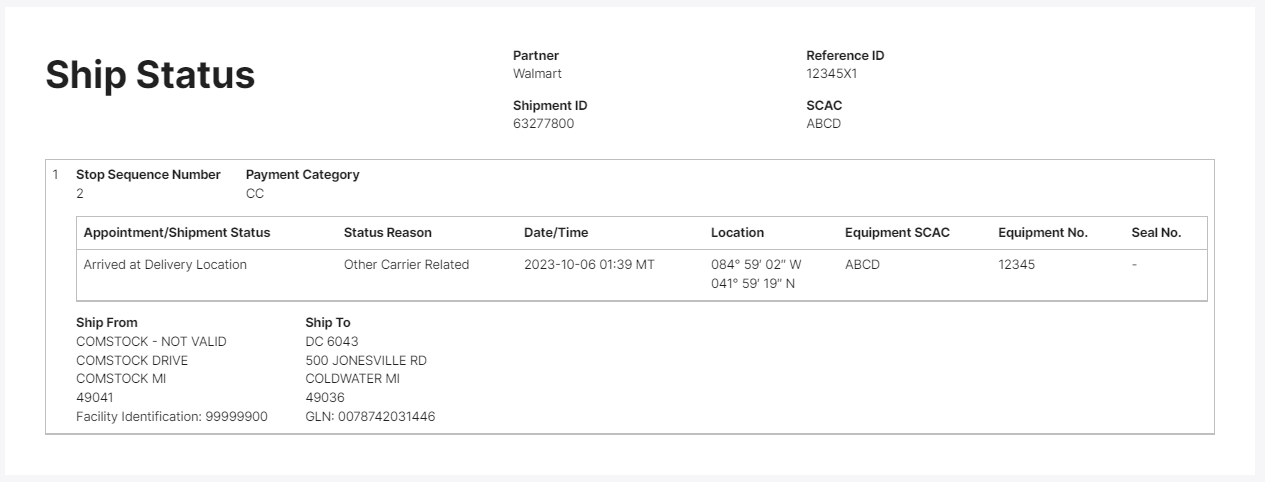
X1 (Arrived at Delivery Location) Status
Navigate to the Shipment Statuses list and get a copy of the previously sent X6 type shipment status.
Change the Reference ID field to a different value such as 12345X1. Proceed to the Status Details section.
Select Arrived at Delivery Location (X1) as the Appointment Status Code.
Keep all other fields the same.
Then create the ship status, generate the EDI and send.
X1 (Arrived at Delivery Location) Status
D1 (Completed Unloading) Status
Navigate to the Shipment Statuses list and get a copy of the previously sent X1 type shipment status.
Change the Reference ID field to a different value such as 12345D1. Proceed to the Status Details section.
Select Completed Unloading (D1) as the Appointment Status Code.
Keep all other fields the same.
Then create the ship status, generate the EDI and send.
D1 (Completed Unloading) Status
Udith Gunaratna
Udith is the Chief Technology Officer at Aayu Technologies. With over 9 years of experience in the enterprise software industry, he has been instrumental in architecting, developing, and maintaining a range of enterprise software solutions, particularly B2B communication software, with a significant focus on cloud technologies.
Talk to an EDI Expert
Stay Compliant. Stay Connected. Powered by AS2.
Join hundreds of organizations already taking full control of their B2B AS2 communications with our trusted solutions. Contact us today to tailor a solution that fits your specific AS2 EDI needs.
Request a demo and take a live look at all the features of our AS2 EDI solutions.
Get answers to your questions and explore customizations that we can offer tailored specifically for you.
Get to know the dedicated deployment option available for your specific use cases.
No commitment, all value. Try the AS2 Solution Risk-Free and
discover how our solutions can transform your business workflows. No credit card required.