MFT Gateway is a hosted Software as a Service (SaaS) solution that enables file exchange over the AS2 or SFTP protocol, without the need to install or maintain.
- Blog
- Configuring EDI connections with Walmart
Walmart
Configuring EDI connections with Walmart
Configuring EDI connections with Walmart, using RetailLink Global Enterprise Mailbox (GEM)

Asankha Perera
Modified: 16 Oct 2025

Introduction
In our first article, we looked at the steps required to set up an AS2 connection with Walmart. In this article, we look at the steps required to get started with EDI, and on how to pass the required EDI validation steps, before you can start the exchange of EDI documents with Walmart. If you are new to Walmart RetailLink, or the Global Enterprise Mailbox (GEM), please read through the first article before you proceed.
We will demonstrate the EDI configuration with an EDI Generator Software as a Service (SaaS) or rather ‘EDI as a Service’ account, which includes a free 30-day trial, with openly published pricing. Open pricing ensures that you are charged a fair amount, and the same rates as for everyone else, unlike closed pricing which differ based on who is asking. Open pricing also guarantees that there are no hidden fees or long term contracts around the use of a service. With the lowest subscription starting at $29 per month, the solution is affordable, and the cost will depend mainly on the volume of EDI messages exchanged, and can be upgraded or downgraded anytime. Users only pay for the actual volume used. The EDIGenerator service fees already includes the complementary MFTGateway service which is used to perform the underlying AS2 communications with Walmart, using secure digital signatures and encryption. In addition, the EDIGenerator includes the capability to generate SSCC-18 Shipping Labels required to be pasted on Pallets and Packages etc, and thus, it is all you need to supply to Walmart, or similar organizations.
Getting started with RetailLink
When you login to your Walmart RetailLink account, you will land on its home page
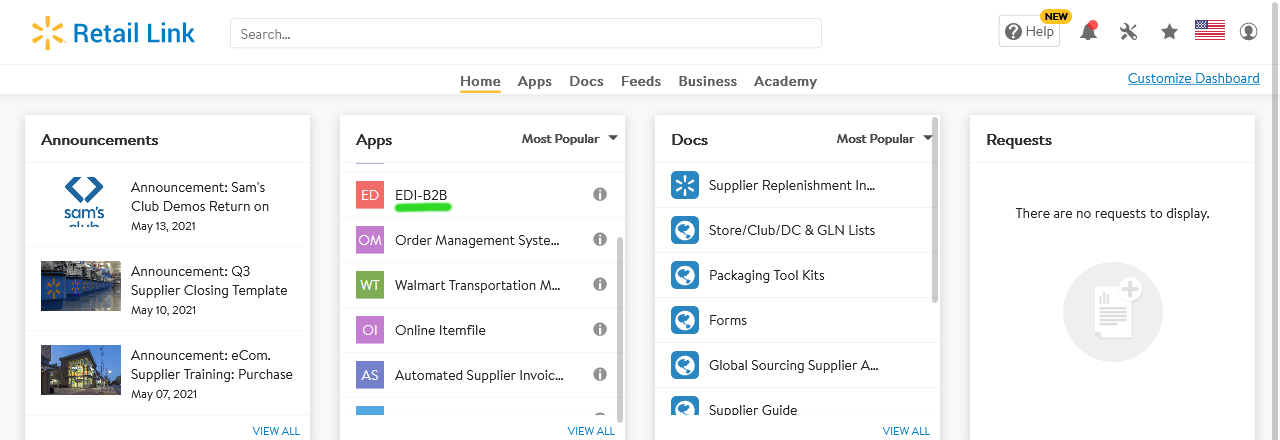
Select ‘Payment’ under ‘Onboarding tasks’ and you will be able to select ‘EDI Information’ option for EDI communications with Walmart.

Once you select the ‘EDI Information’ option you will be directed to ‘Set up EDI-B2B’ page. Click on ‘Continue Setup’ to proceed.
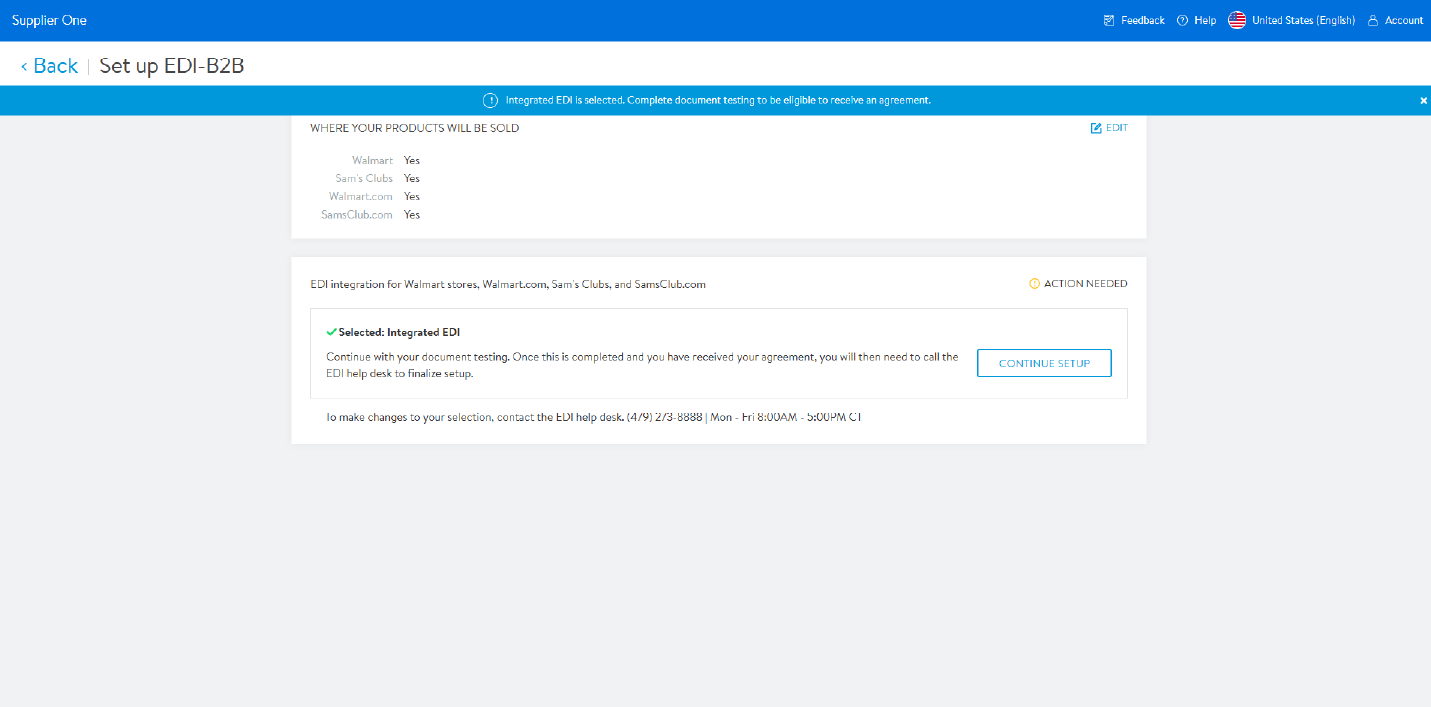
The EDI configuration is under the ‘Global Enterprise Mailbox’ or GEM, similarly to the AS2 configuration. When you visit the GEM, you will be presented with the Portal Dashboard page as the home. Your main interactions however, will be through the menu item links at the top.

Setting up the AS2 Connectivity
Before proceeding with the configuration of the EDI transactions, you are required to setup and configure your AS2 connection with Walmart. Please refer and complete these steps following our first article of this series: AS2 Connection setup for Walmart RetailLink GEM
Requesting the EDI transactions to be enabled
From the ‘Document Testing’ menu navigate to ‘Available Transaction’ and then choose the appropriate country for your interactions with Walmart. You can then download the EDI transaction guides for the listed EDI transactions, and click ‘Request’ to request those transactions to be used in your EDI account.

Testing the EDI transactions
From the menu select ‘Document Testing’ and then ‘Portal Dashboard’ and navigate to the main screen where you will test your EDI transactions which is as follows.
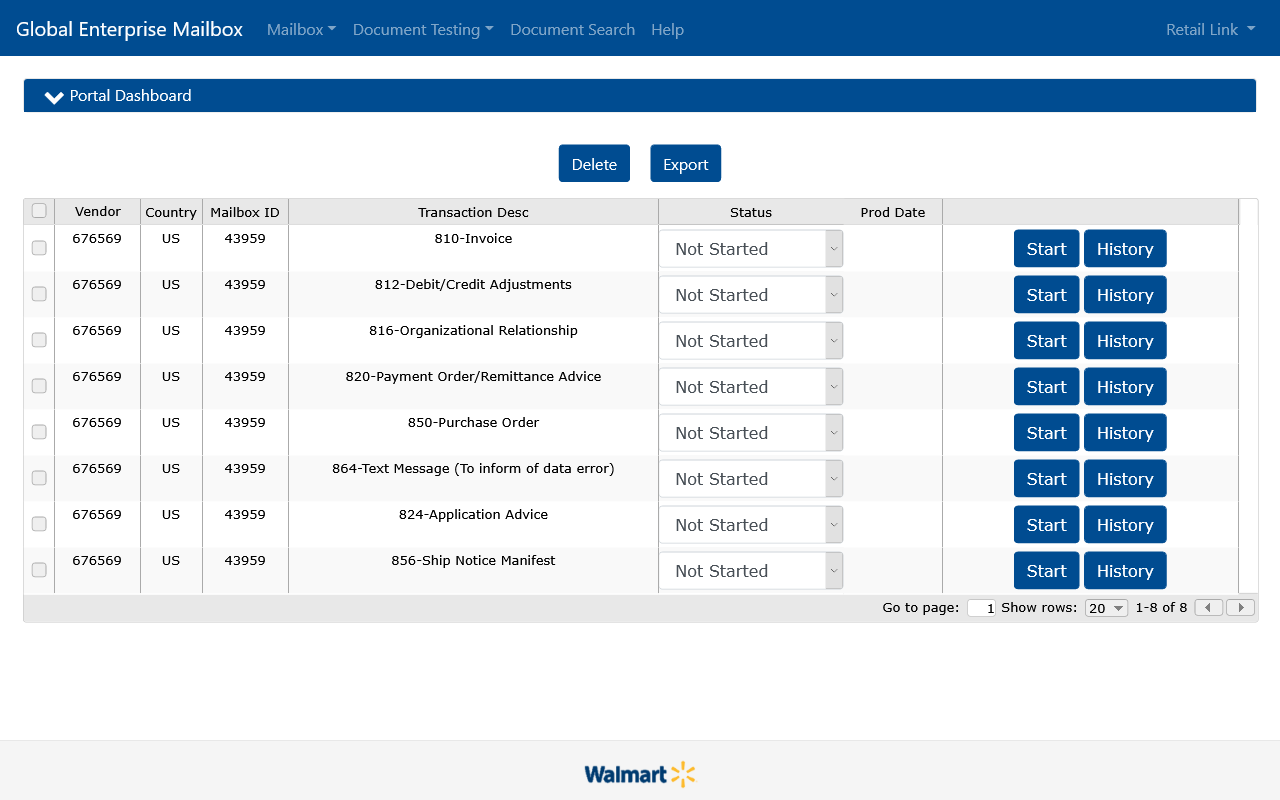
As shown above, initially your selected transactions will appear here as ‘Pending’ or ‘Not Started’. Depending on the current state for each document, you will be able to request changes to the status, or click the ‘Profile’ button to navigate to the transaction test screen.
Document Statuses
The Status of EDI documents will change through the following list as you progress through the testing and verification phases for each transaction. Some stages require validation or confirmation from the appropriate Walmart side, or your EDI vendor contact. The high level document statuses are as follows:
- Pending
- Initial status when a transaction type has been requested from the available transactions list, and is awaiting approval from the appropriate Walmart representative to proceed.
- Not Started
- When a new request was in ‘Pending’ state and was approved by Walmart. The Vendor needs to click ‘Start’ to begin testing.
- Setup Information
- When the vendor has clicked ‘Start’ on a previously ‘Not Started’ document, the status will change to this state. The vendor now has to populate the setup data for the document and ‘Save’.
- Test EDI Data
- When vendor has successfully specified and saved the setup data, and is ready to begin testing with EDI data. At this stage the vendor must receive a ‘Successful’ test result for all the sub usages marked as ‘Must use’.
- Requested Parallel
- Once the vendor completes the Test EDI Data stage, and clicks the ‘Request Parallel’, the status changes into this state. Walmart will then complete the required actions on its side, and the document status will change to ‘Monitor Parallel’, which means that the transaction documents are now ready to be sent and received over the AS2 connection
- Monitor Parallel
- The Monitor Parallel state occurs when a vendor is actively sending and receiving test data over AS2. The vendor must meet all testing criteria required by Walmart, and once those are met, the status will change to ‘Schedule Production’
- Schedule Production
- This status occurs when the vendor has successfully completed parallel testing and is deemed ready to be moved into production EDI. The vendor must schedule a production date (See earlier in this article)
- Completed
- This is the final state when the vendor has been moved into production for this document.
Note: The above steps maybe fast-forwarded by Walmart in reality, and may actually complete quickly if all goes well.
Testing files received from Walmart such as Purchase Orders
Let’s see how the validation process works for a message you will receive from Walmart. When you open the testing page for Purchase Orders (850) as an example, you will see a screen as follows. Here you will need to ensure that the ‘Setup Data’ section contains the correct supplier IDs for ISA/GS headers, and the separators such as the element and segment separators shown are correct. Also note the Walmart ISA/GS information, and check the ‘Save as Defaults’ checkbox and click ‘Save’ to confirm. Next you can customize the test items to be included into the PO for your testing - if that’s required.
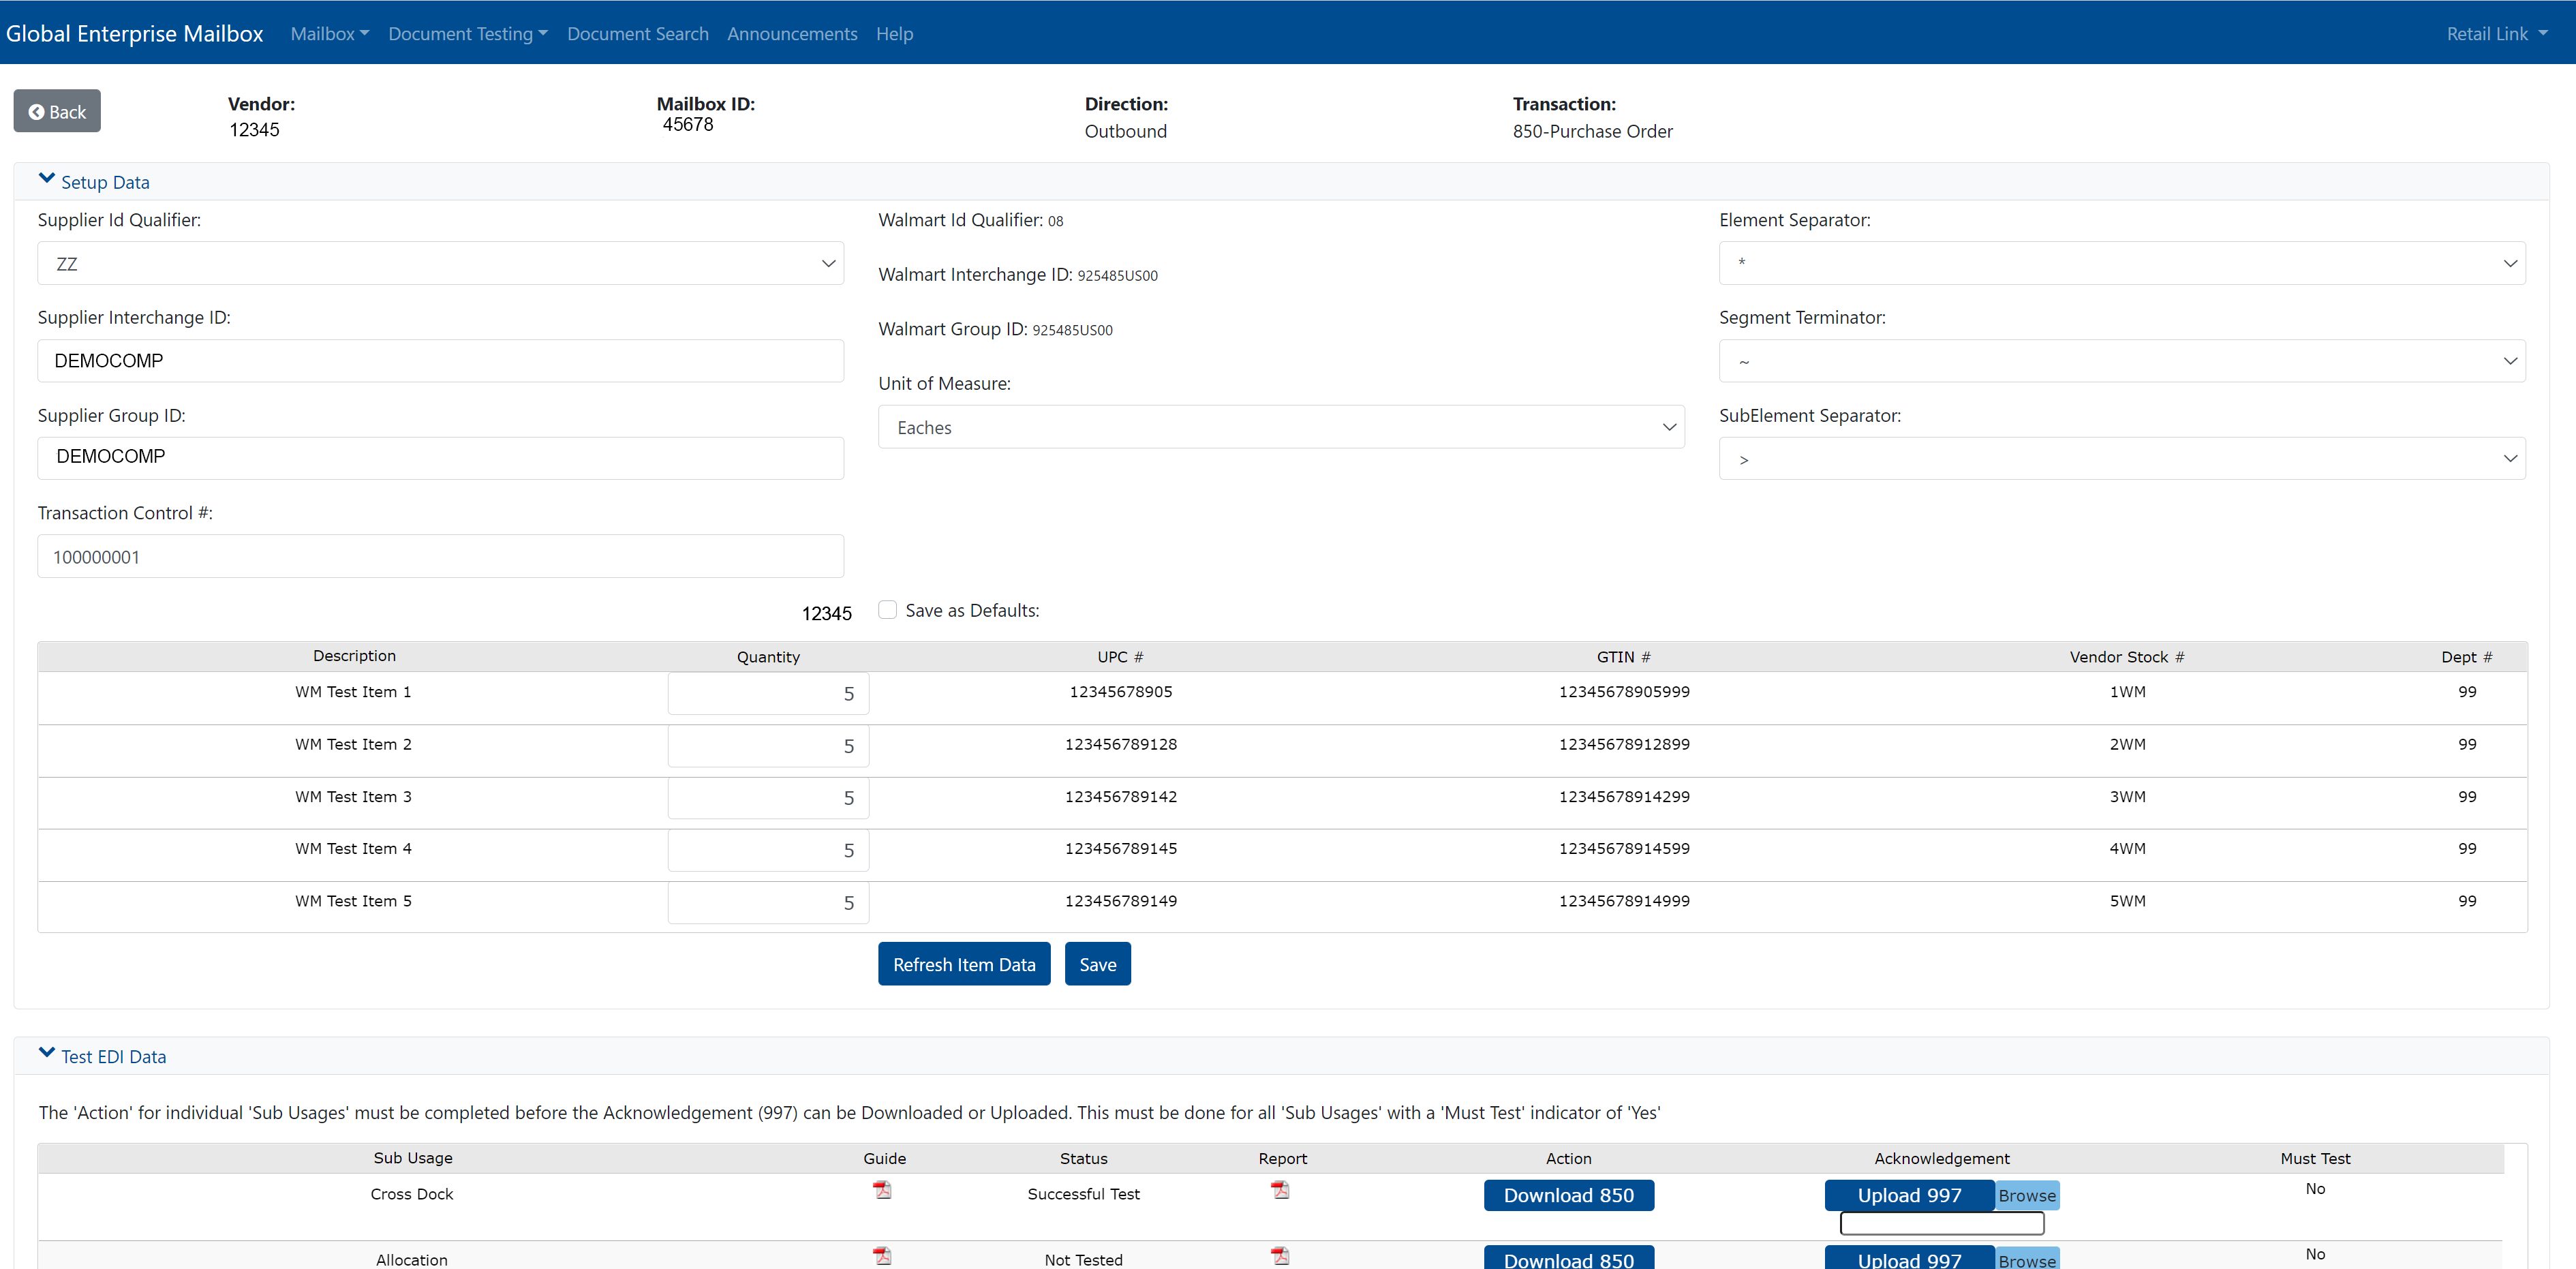
Next under ‘Test EDI Data’ click the ‘Download 850’ from the sub usage of interest, you will be able to download a sample EDI file for that scenario generated from Walmart. You will now need to process this PO through your system, and then upload the resulting 997 Functional Acknowledgement generated by your system as a file. If any errors are detected processing the 997 FA, you will be able to find more information about them by looking at the validation ‘Report’ which you can download.
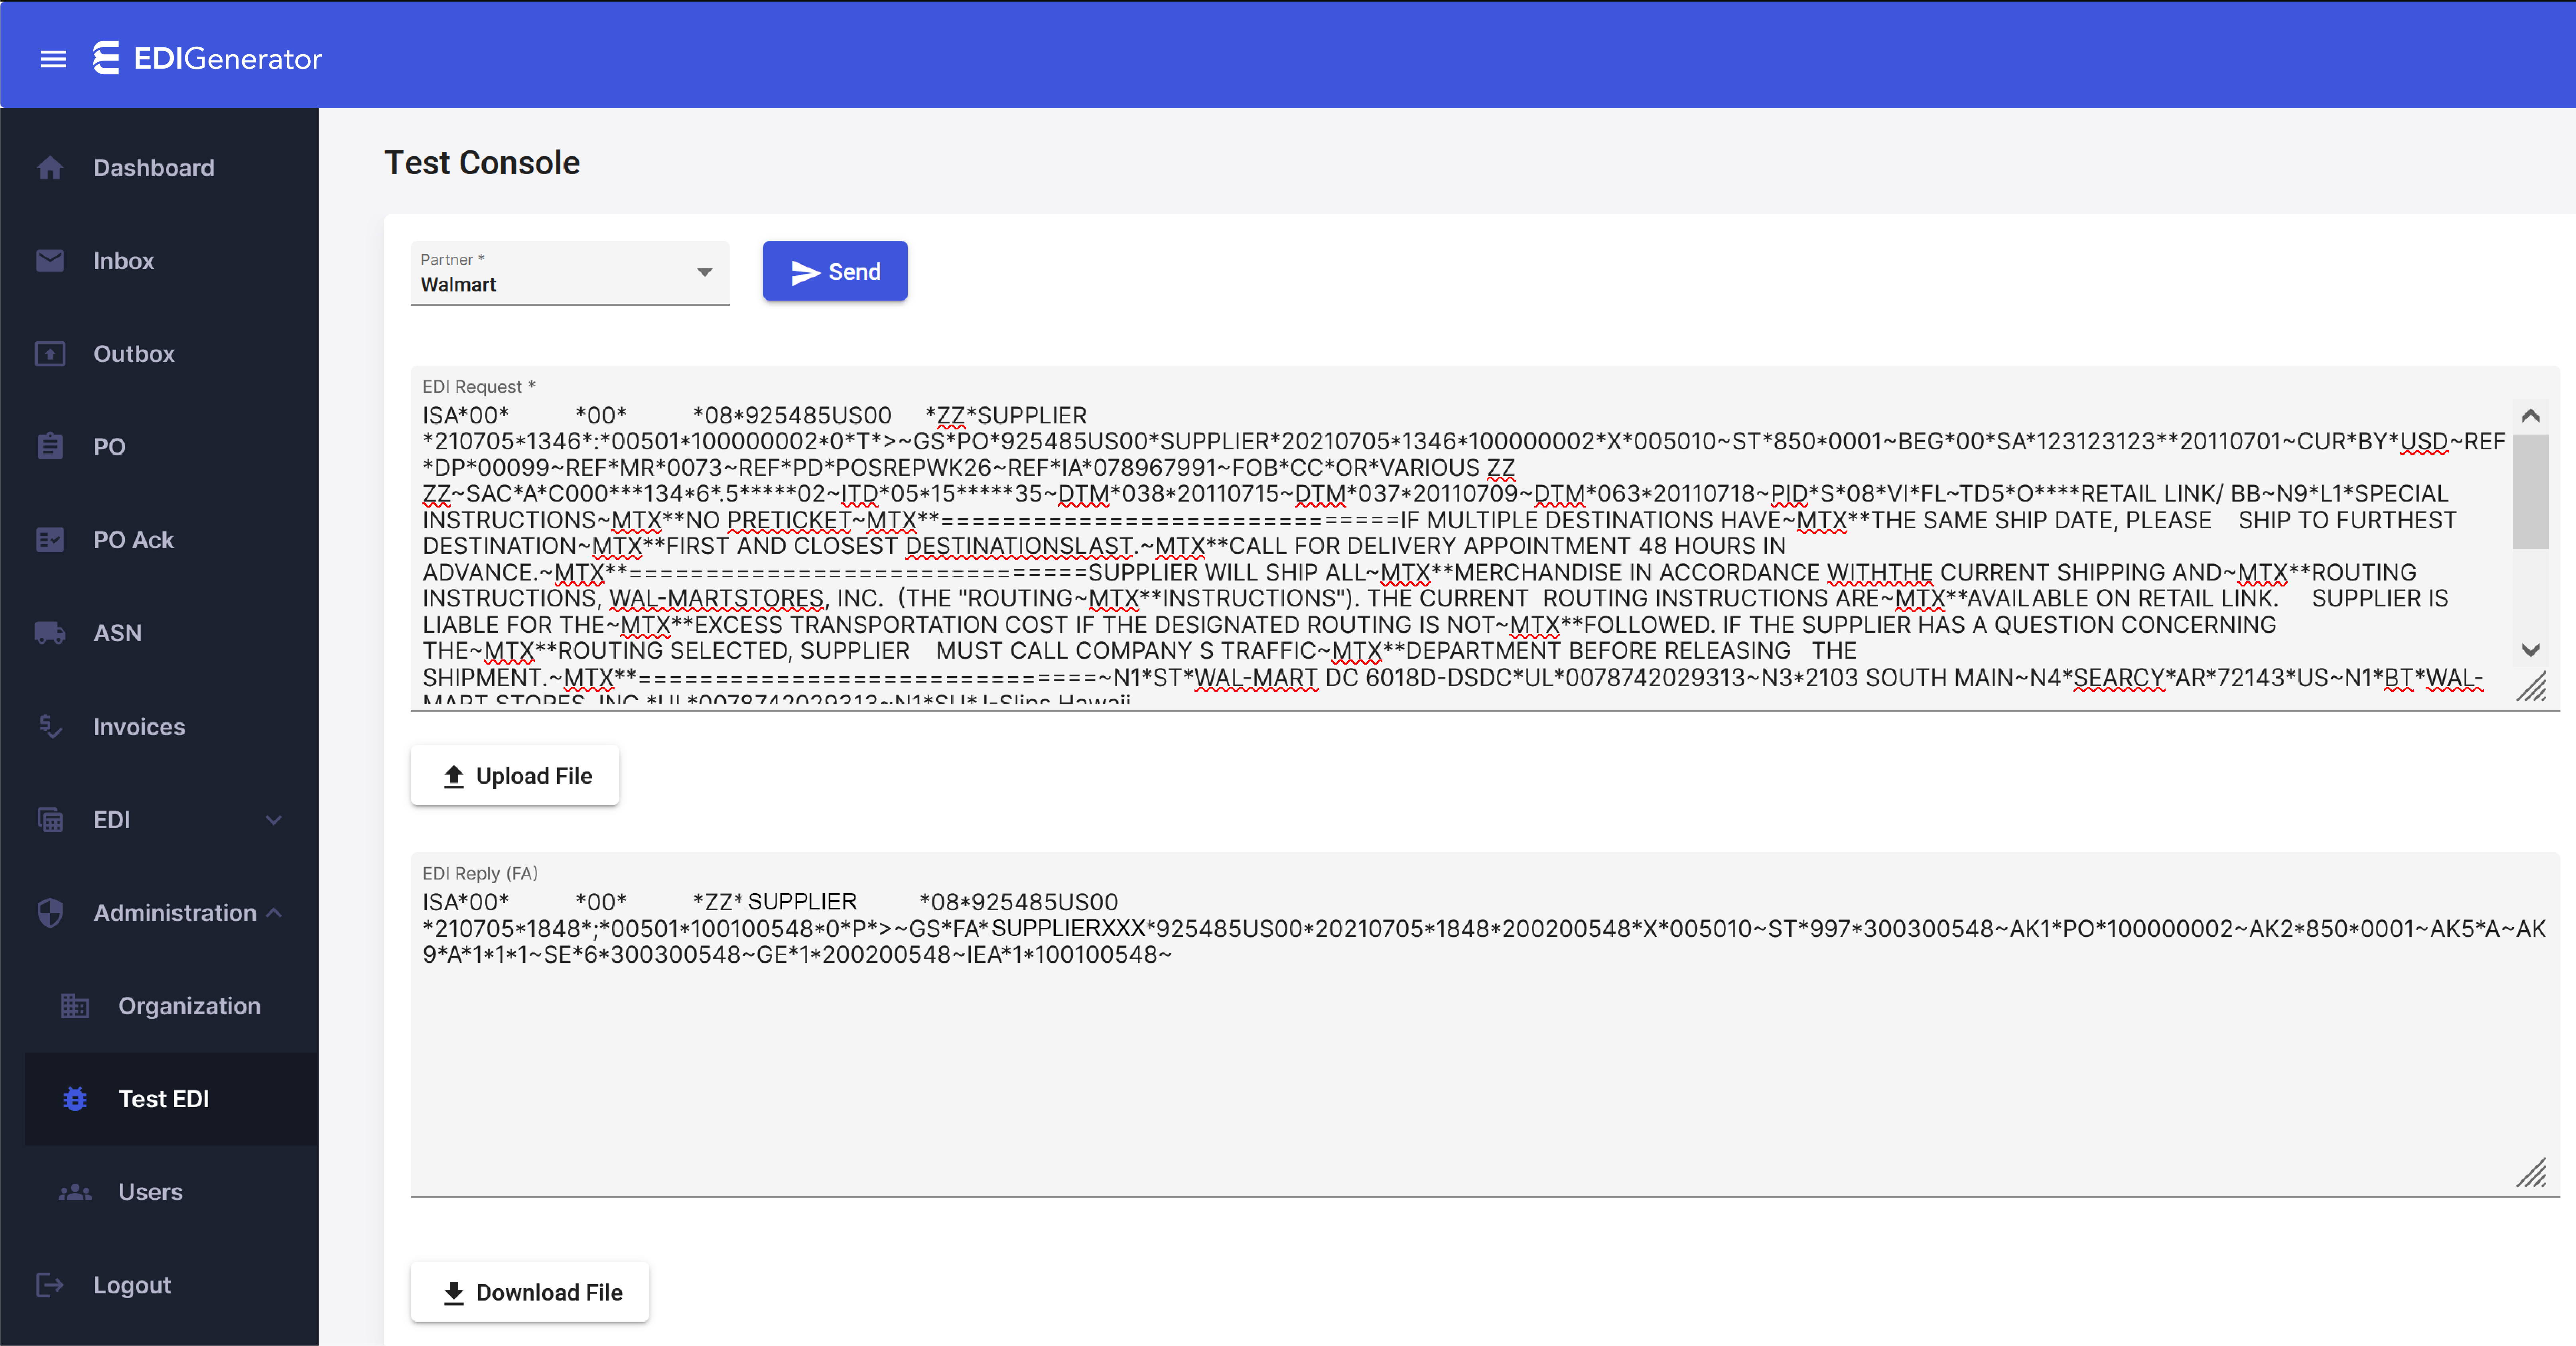
To process the Purchase Order through the EDIGenerator, navigate to ‘Administration’ and then ‘Test EDI’ from the menu. Then upload the EDI file downloaded from the above step, select ‘Walmart’ as the Partner, and click ‘Send’. The PO will be processed by the EDIGenerator, and the resulting 997 Functional Acknowledgement will be available to view and download. Download the FA into a file and upload it as the FA to the Walmart Portal. If an error was detected by Walmart, the status will be updated accordingly, and a ‘Report’ generated with the detailed results of processing.
Testing files sent to Walmart such as ASNs or Invoices
Clicking the ‘Profile’ button from the ‘Portal Dashboard’ for the 856 - Ship Notice Manifest or ASN will take you to the following screen.
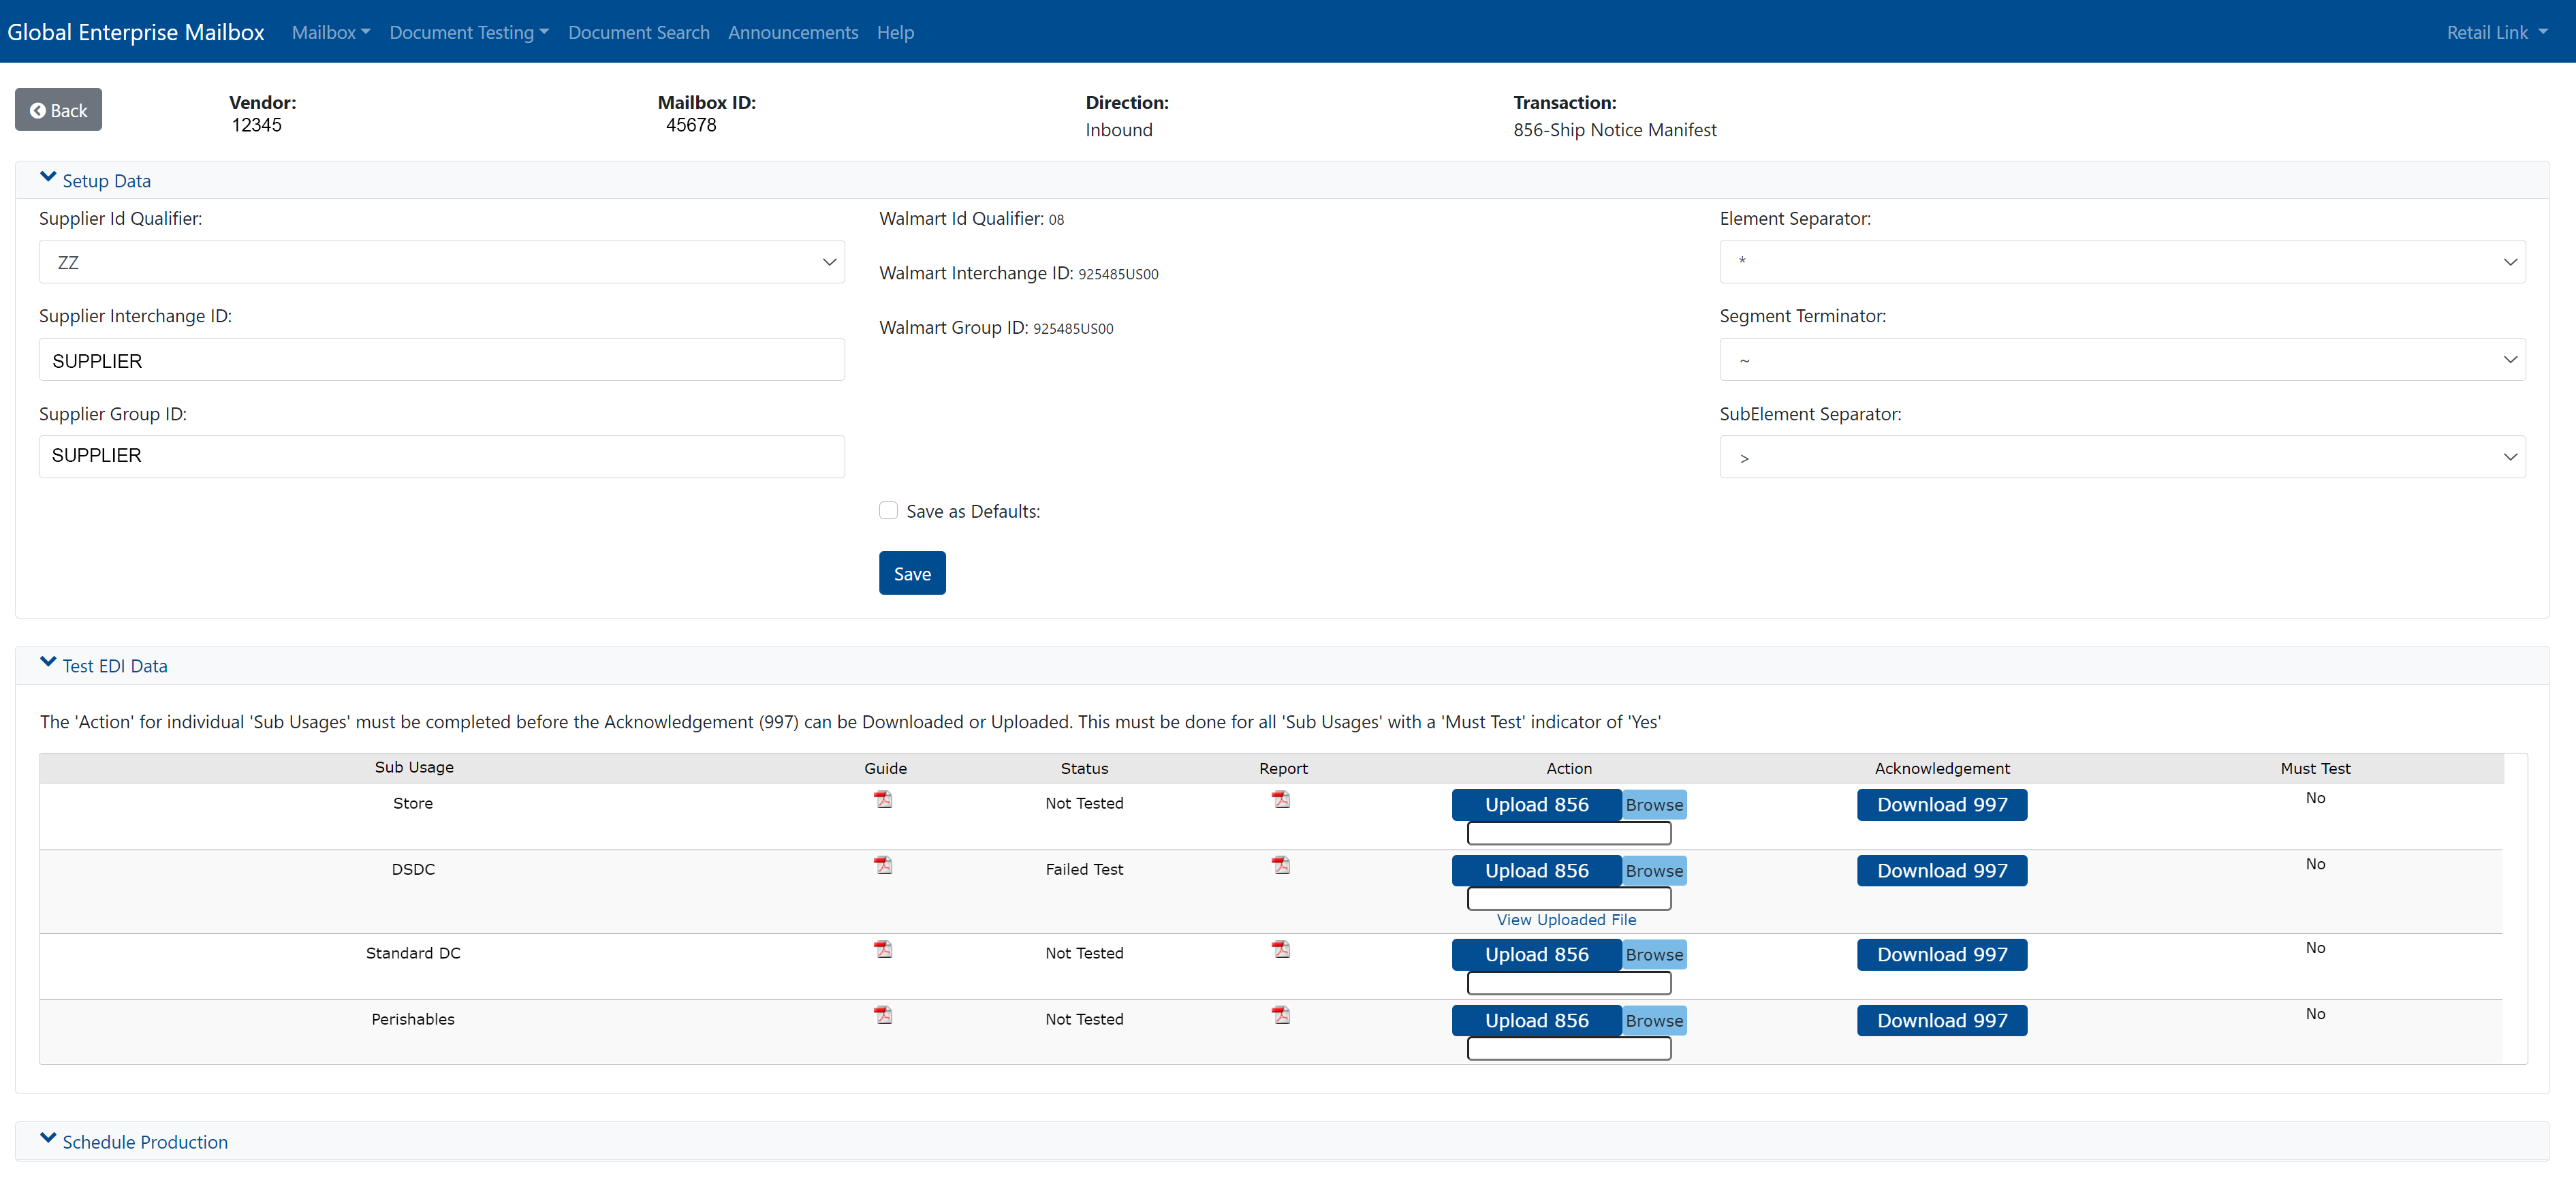
Next navigate to the ‘Test EDI Data’ section, and for the various sub usages refer the ‘Guide’ and note if that sub usage is marked as ‘Must Test’. You will need to complete testing of all the ‘Must Test’ sub usages, and any of the other applicable ones. You are now expected to create a sample ASN from your EDI application, which you need to save into a file, and then click the ‘Browse’ button to select and then ‘Upload’.
In the EDIGenerator, navigate to the PO menu item and click ‘Generate ASN’ for the test PO you processed initially.

You can specify a Shipment ID and then click the ‘Re-generate SSCC-18 barcodes’ button and click the ‘Create’ button at the bottom of the page. Once the document is created, you can click ‘Generate’ and this will generate the EDI version of the ASN, which you can now download into a file by clicking the ‘Download’ button at the bottom.
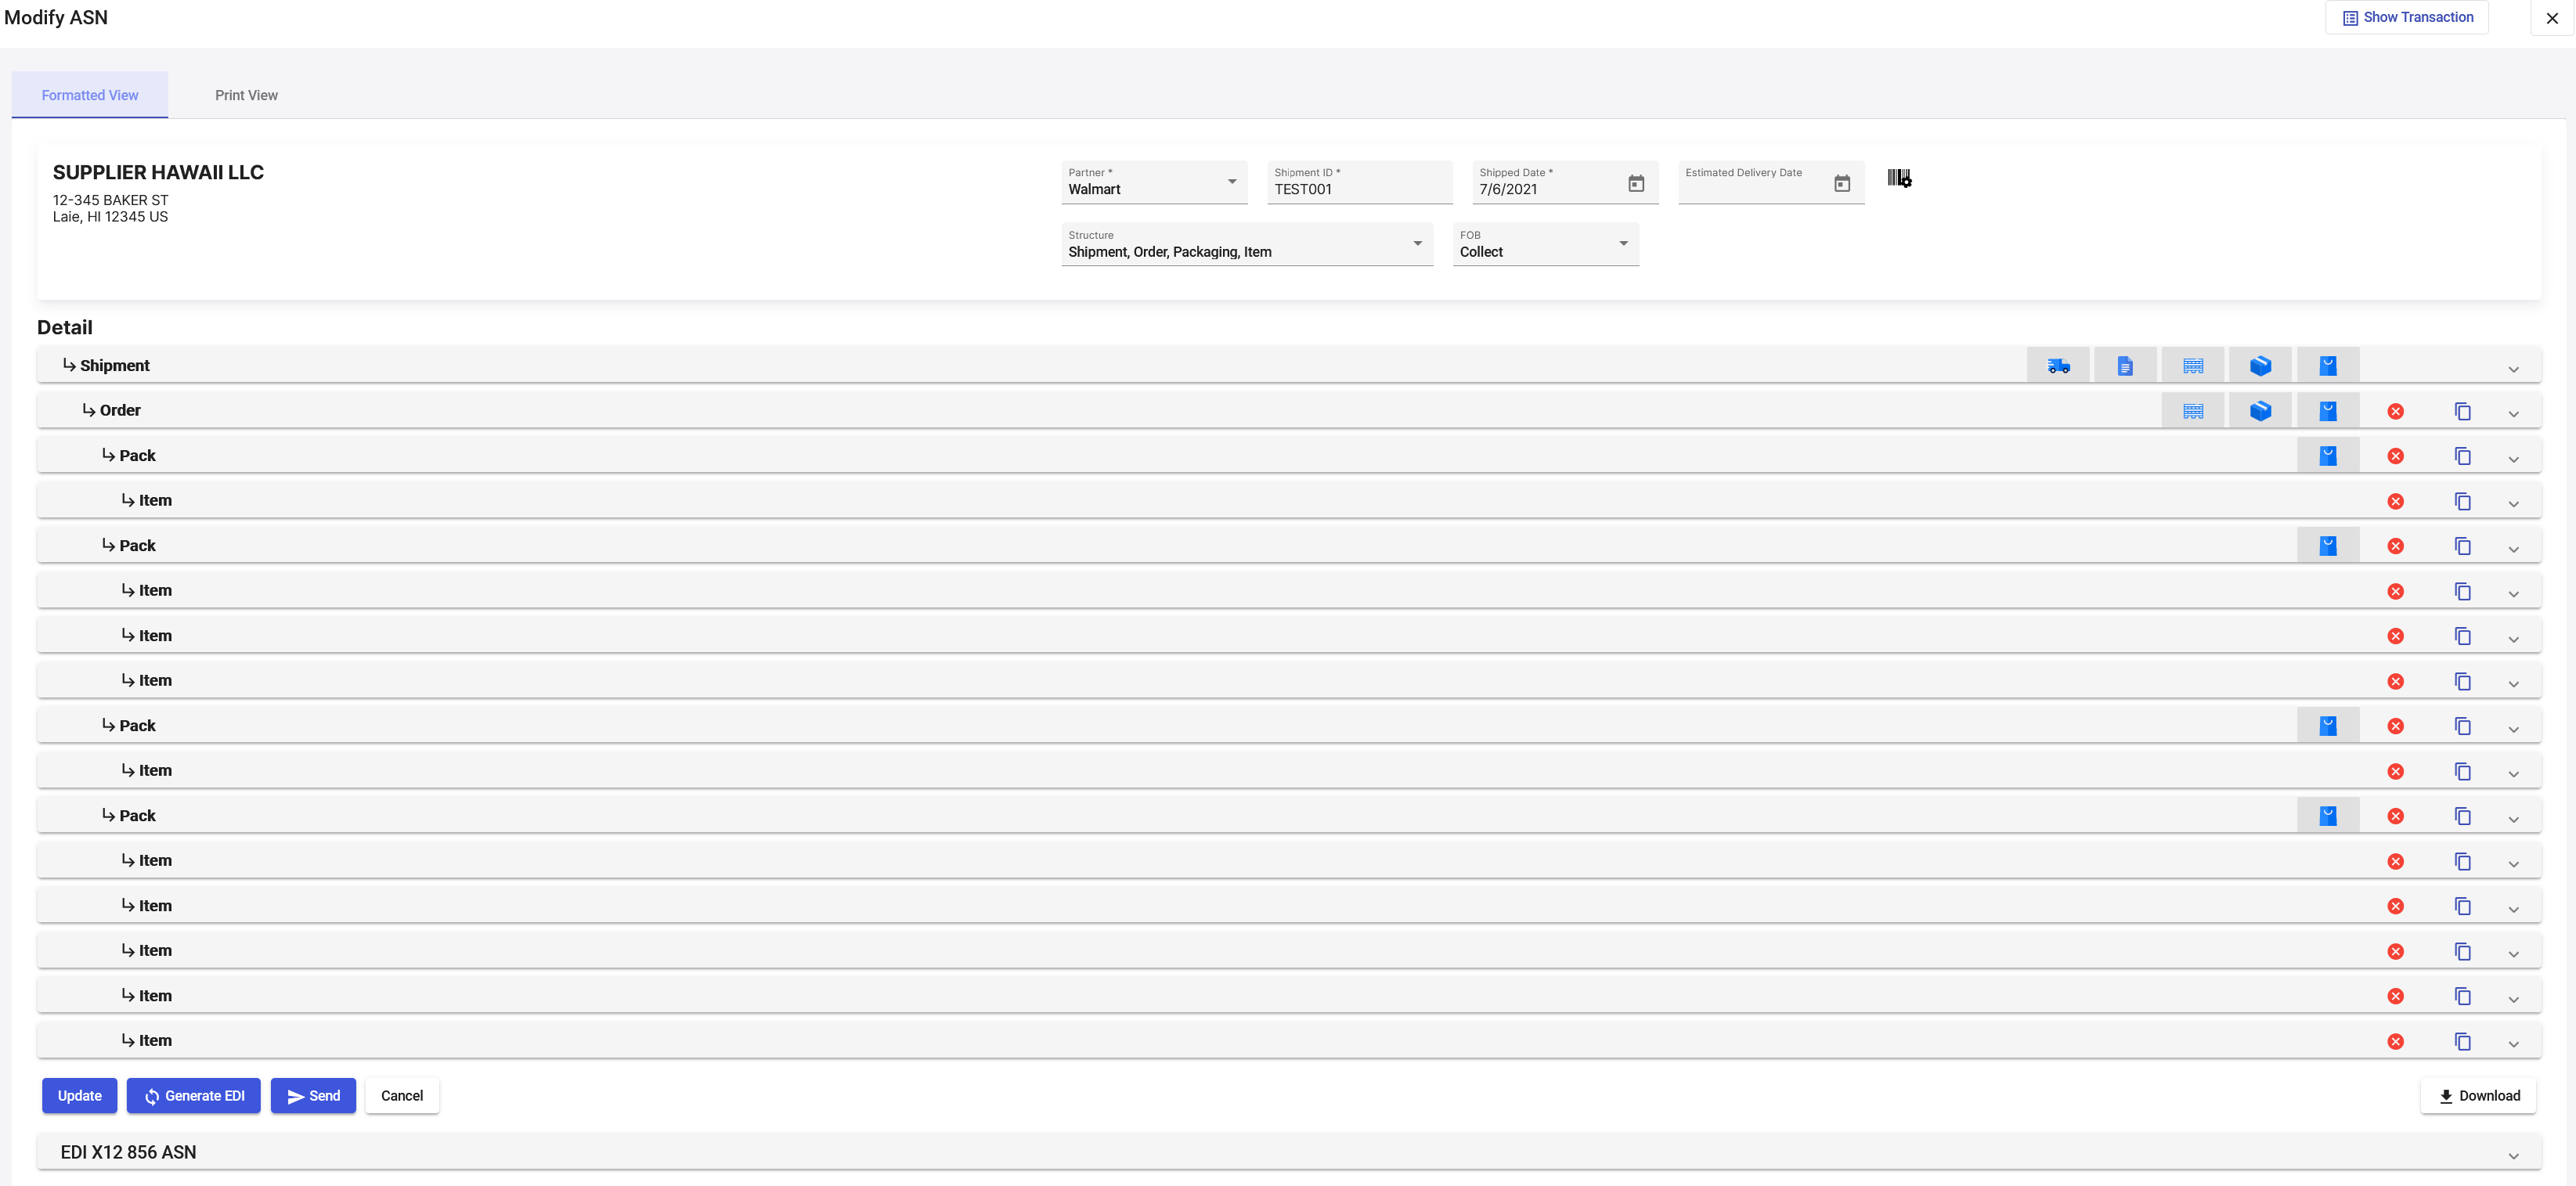
Now you can use this 856 Ship Notice Manifest EDI file and upload it into the Walmart portal as the ASN file, and then download the 997 Functional Acknowledgement, and also check the results of the EDI processing at Walmart end by checking the status, and the ‘Report’ generated.

For successfully validated uploads, you can download a sample 997 generated by Walmart, and use it for your testing if required. If for some reason your uploaded file fails the validation, clicking on the ‘Report’ will allow you to download a PDF report of the processing result, which will help you locate the error.
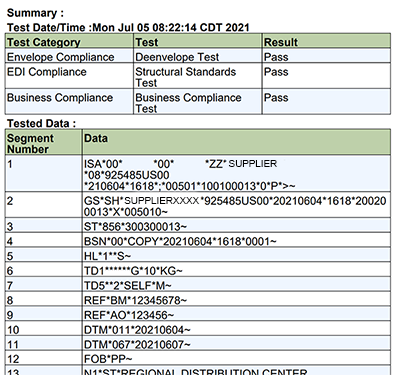
You may retry the validation again, until each of the required sub usages are successful. Finally you can go to the ‘Schedule Production’ section and select the production date and save it into the system. However you should first check with your Walmart contact prior to this step, as the actual production cutover will also require the validation of Shipping Labels you would generate etc and other steps which needs to be completed before.
You can go ‘Back’ and select another transaction to be tested now.
Completion of validations for all transactions
For a typical supplier scenario, you will possibly need to successfully complete the validations for the following EDI transaction sets:
- 810 Invoice
- 816 Organizational Relationship
- 820 Payment Order / Remittance Advice
- 864 Text Message
- 856 Ship Notice Manifest (ASN)
- 824 Application Advice
- 850 Purchase Order
Once all testing is completed, your final state would be similar to the following. Congratulations! your configuration is now complete, and you can use the EDIGenerator to electronically exchange EDI documents with Walmart.


Talk to an EDI Expert
Join hundreds of organizations already taking full control of their B2B AS2 communications with our trusted solutions. Contact us today to tailor a solution that fits your specific AS2 EDI needs.
Related Articles
View All BlogsExplore our product stack
Try before you buy with a 30-day Free Trial
No commitment, all value. Try the AS2 Solution Risk-Free and discover how our solutions can transform your business workflows. No credit card required.
Explore Your Possibilities
Elevate AS2 Communications with our EDI and AS2 Solutions
See how our AS2 and EDI solutions can simplify your integrations, boost efficiency, and keep you compliant—request a personalized demo today.


